
Astrophotography Tutorial – Dark Skies and Moon Phase
While it’s true that you’ll get clearer images of the stars in a ‘dark sky area’, don’t let a bit of light pollution prevent you from indulging in your passion for astrophotography. With this astrophotography tutorial I’ll explain how to plan and research the ideal conditions for your nightscapes.
What is Light Pollution?
In astrophotography terms, light pollution is pretty much anything other than star light. Traffic, urban sprawl, even a campfire constitutes light pollution.
If you live in a major city or a large urban centre, it’s still possible to capture clear shots of the stars just by driving 30 minutes out of town. Once you’re out of the major light pollution of the city you’d be surprised at just how much star detail your camera can capture when used properly.
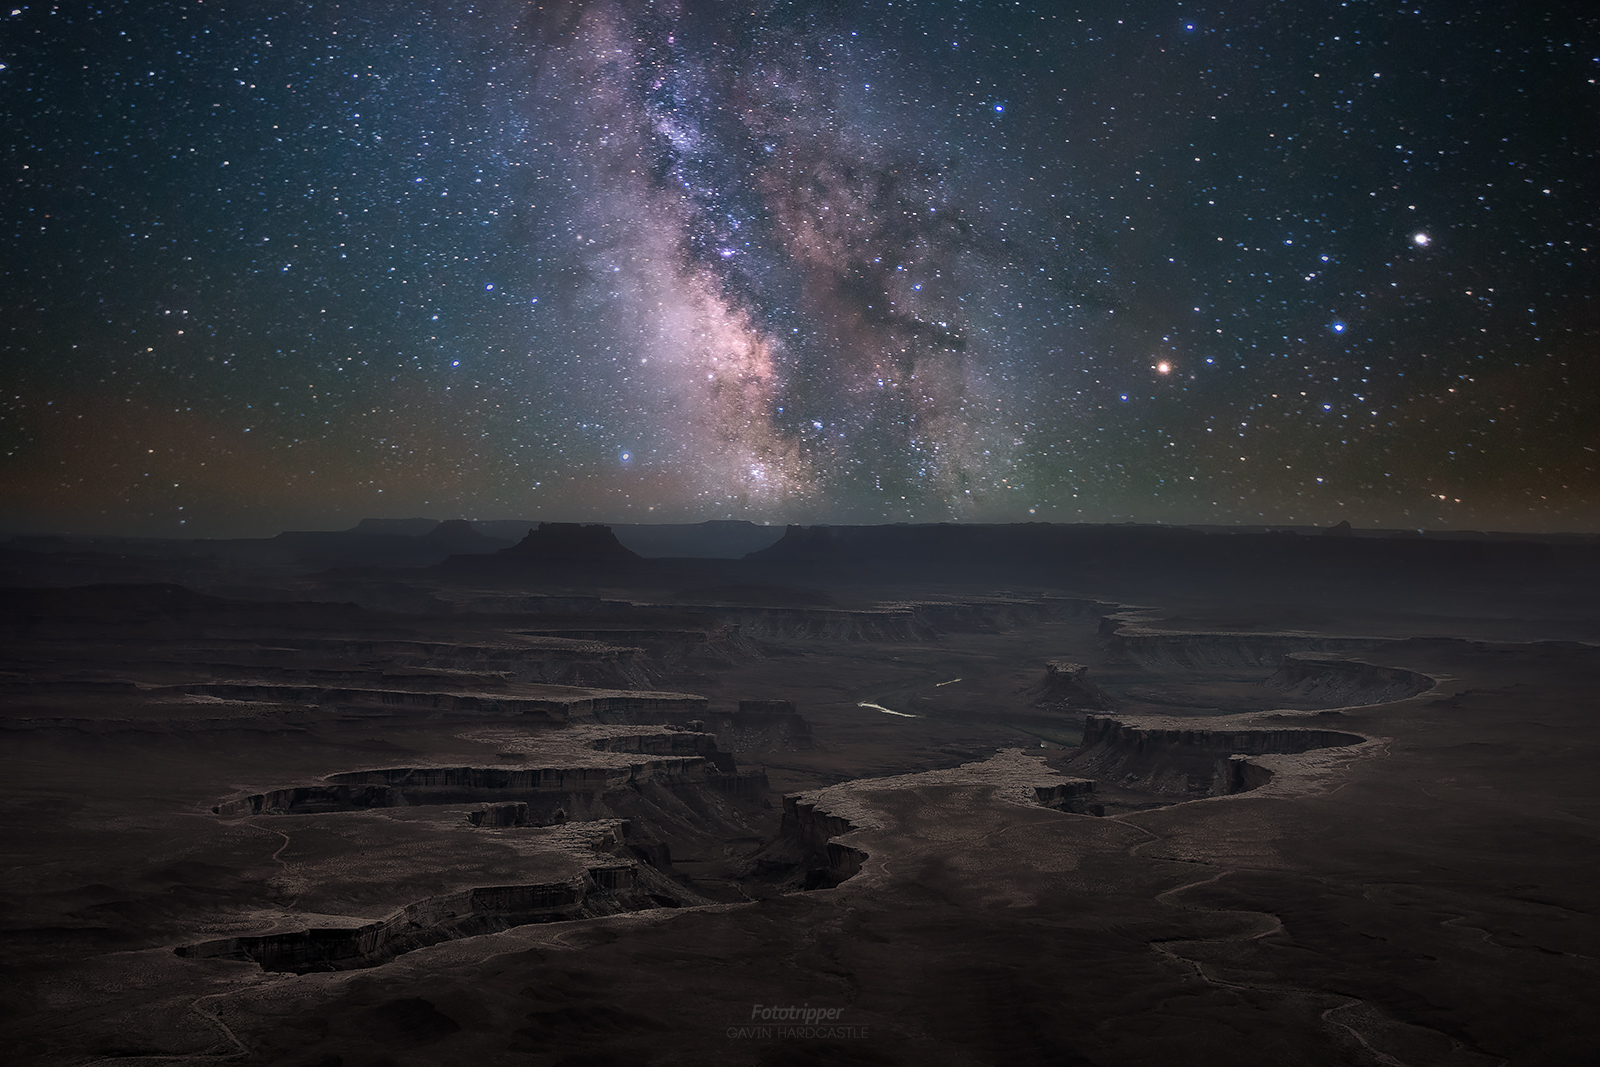
Travel even further and visit a true ‘dark sky area’ and you might just be blown away by the overwhelming blanket of stars bursting out of the night sky. When you reach a true ‘dark sky area’ you can see the Milky Way with the naked eye even with your car headlamps on full beam.
I’ve taken students out on workshops who’ve never before seen the Milky Way in all it’s glory. For many people it evokes a strong emotional response and no matter how many times I see it, I’m still awestruck.
How to Find Your Dark Sky
Here are some popular online resources that will help you figure out where to find the darkest areas with the least amount of light pollution as well as some excellent aurora forecast resources.
International Dark Sky Association – World Wide Map
SkyNews Canada – Only Canadian Locations
Clear Dark Sky – Only North America
Aurora Forecast North America – North America
Aurora Forecast Europe – Europe
Aurora Australis – Southern Hemisphere
Pick a Clear Night
Obviously too much cloud is a major problem, but as long as the clouds aren’t completely covering the sky, it’s still worth venturing out and trying some astrophotography. Sometimes it’s the smattering of cloud in a Milky Way shot that gives it some drama and atmosphere.
Sure, clear skies are great but don’t let a few clouds dissuade you from snagging a potentially killer shot.
If you can see the stars, you can shoot the stars.
A Little Bit of Moon is OK
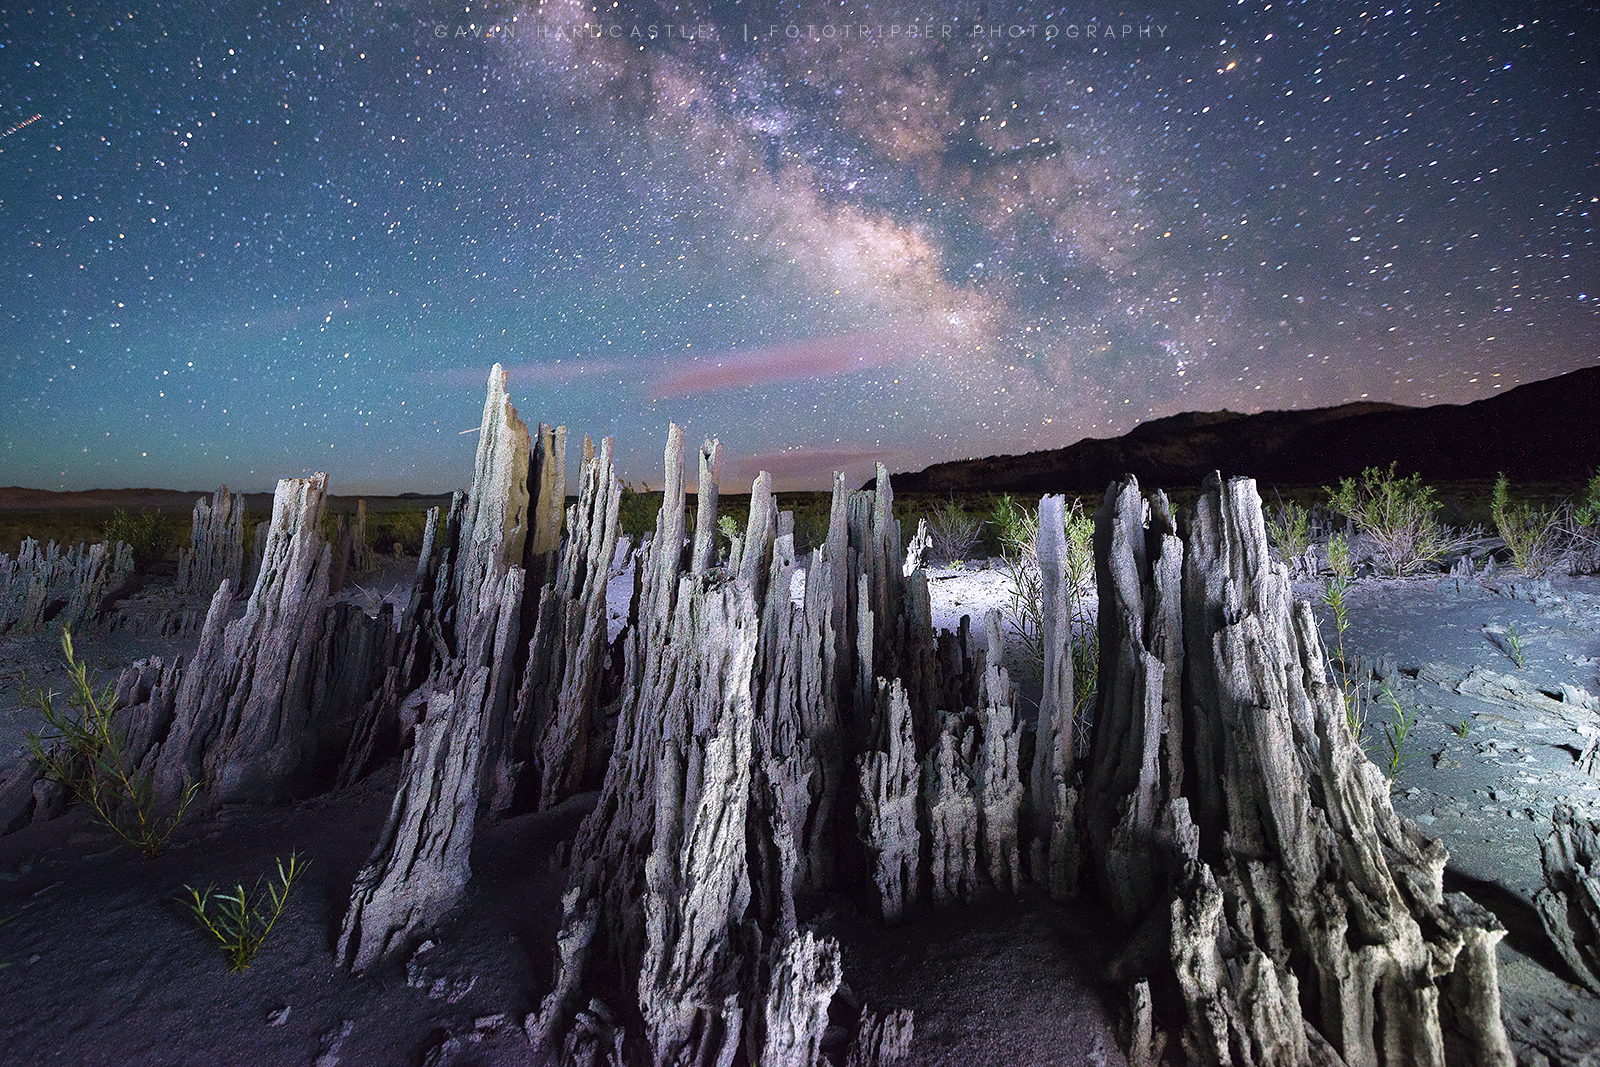
Even if the moon is full, you might still be able to get decent Milky Way shots as long as it doesn’t line up on the same vertical axis as the Milky Way. If it does, it’ll be so bright that it will totally drown out any light from the galactic core. Don’t bother, stay at home and clean your lenses.
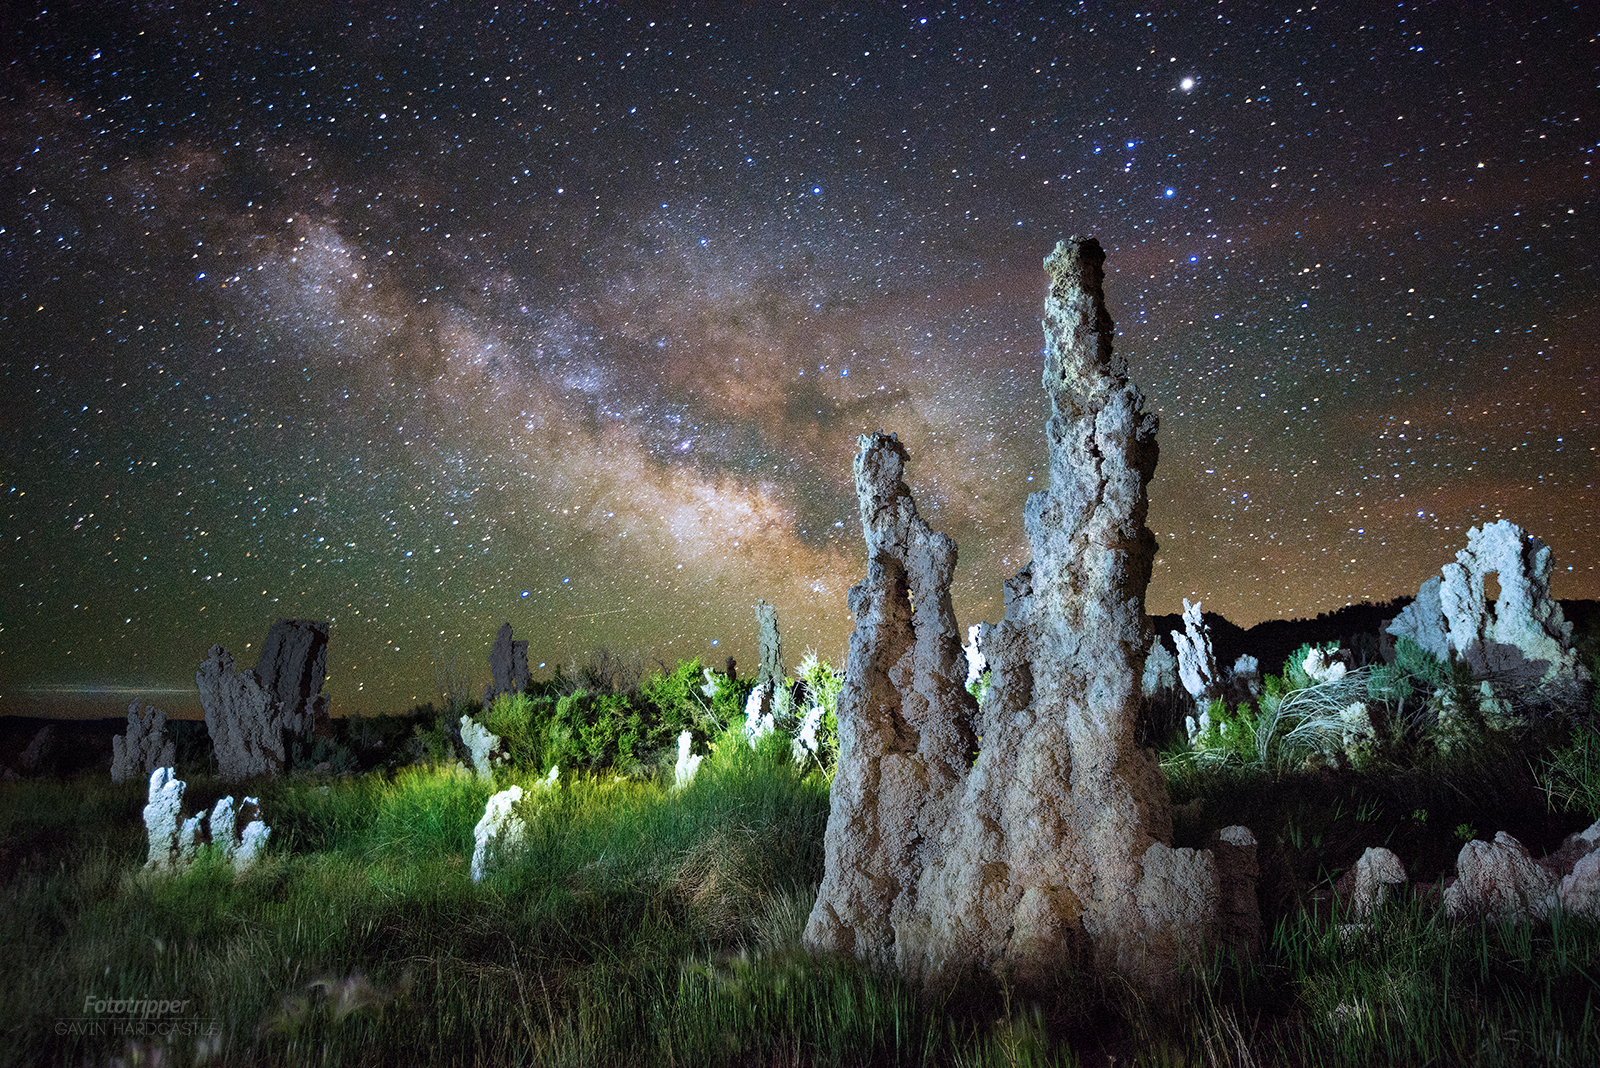
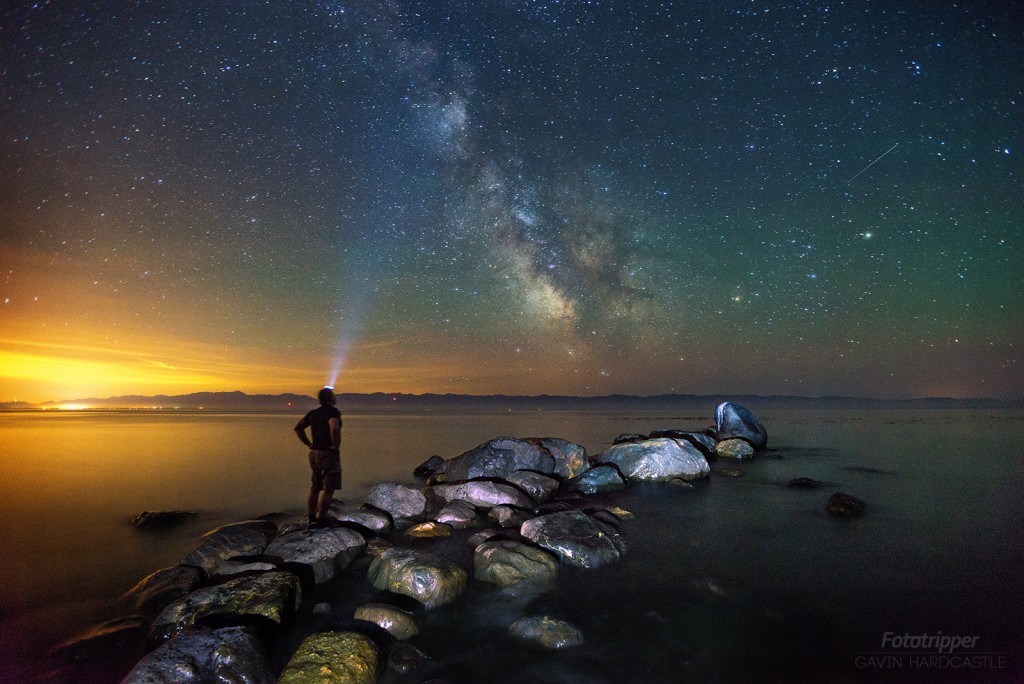
If however, the moon is off on the distant horizon, it can actually offer some really nice ‘side light’ to your foreground subjects without drowning out the light of the galactic core.
The shot above had the moon over in the Western Horizon while the Milky Way was present in the South East. That’s a nice combination whenever you can get it. The moon light provided some gorgeous natural side light on the sand tufa and I also used a headlamp to light the foreground from the same direction as the moon for added punch.
Use the app Stellarium to predict the moonphase and position in relation to the Milky Way and you’ll easily be able to plan shots like that if you get clear skies.
How to Use Stellarium to Figure out Moon Phase
Using Stellarium to figure out where the moon is going to be in relation to the Milky Way is very easy. Using the toolbars simply enter your location (or the nearest one listed in the database) and then enter the time you’re thinking of going out shooting. I’ll break this down for you in three simple steps.
Step 1 – Increase the Brightness of the Milky Way in Stellarium
So that you can see what you’re doing, go into the ‘Sky and Viewing Options’ window or hit F4. Now increase the ‘Milky Way brightness’ to 3.0 so that you can clearly see the Milky Way in all it’s glory.
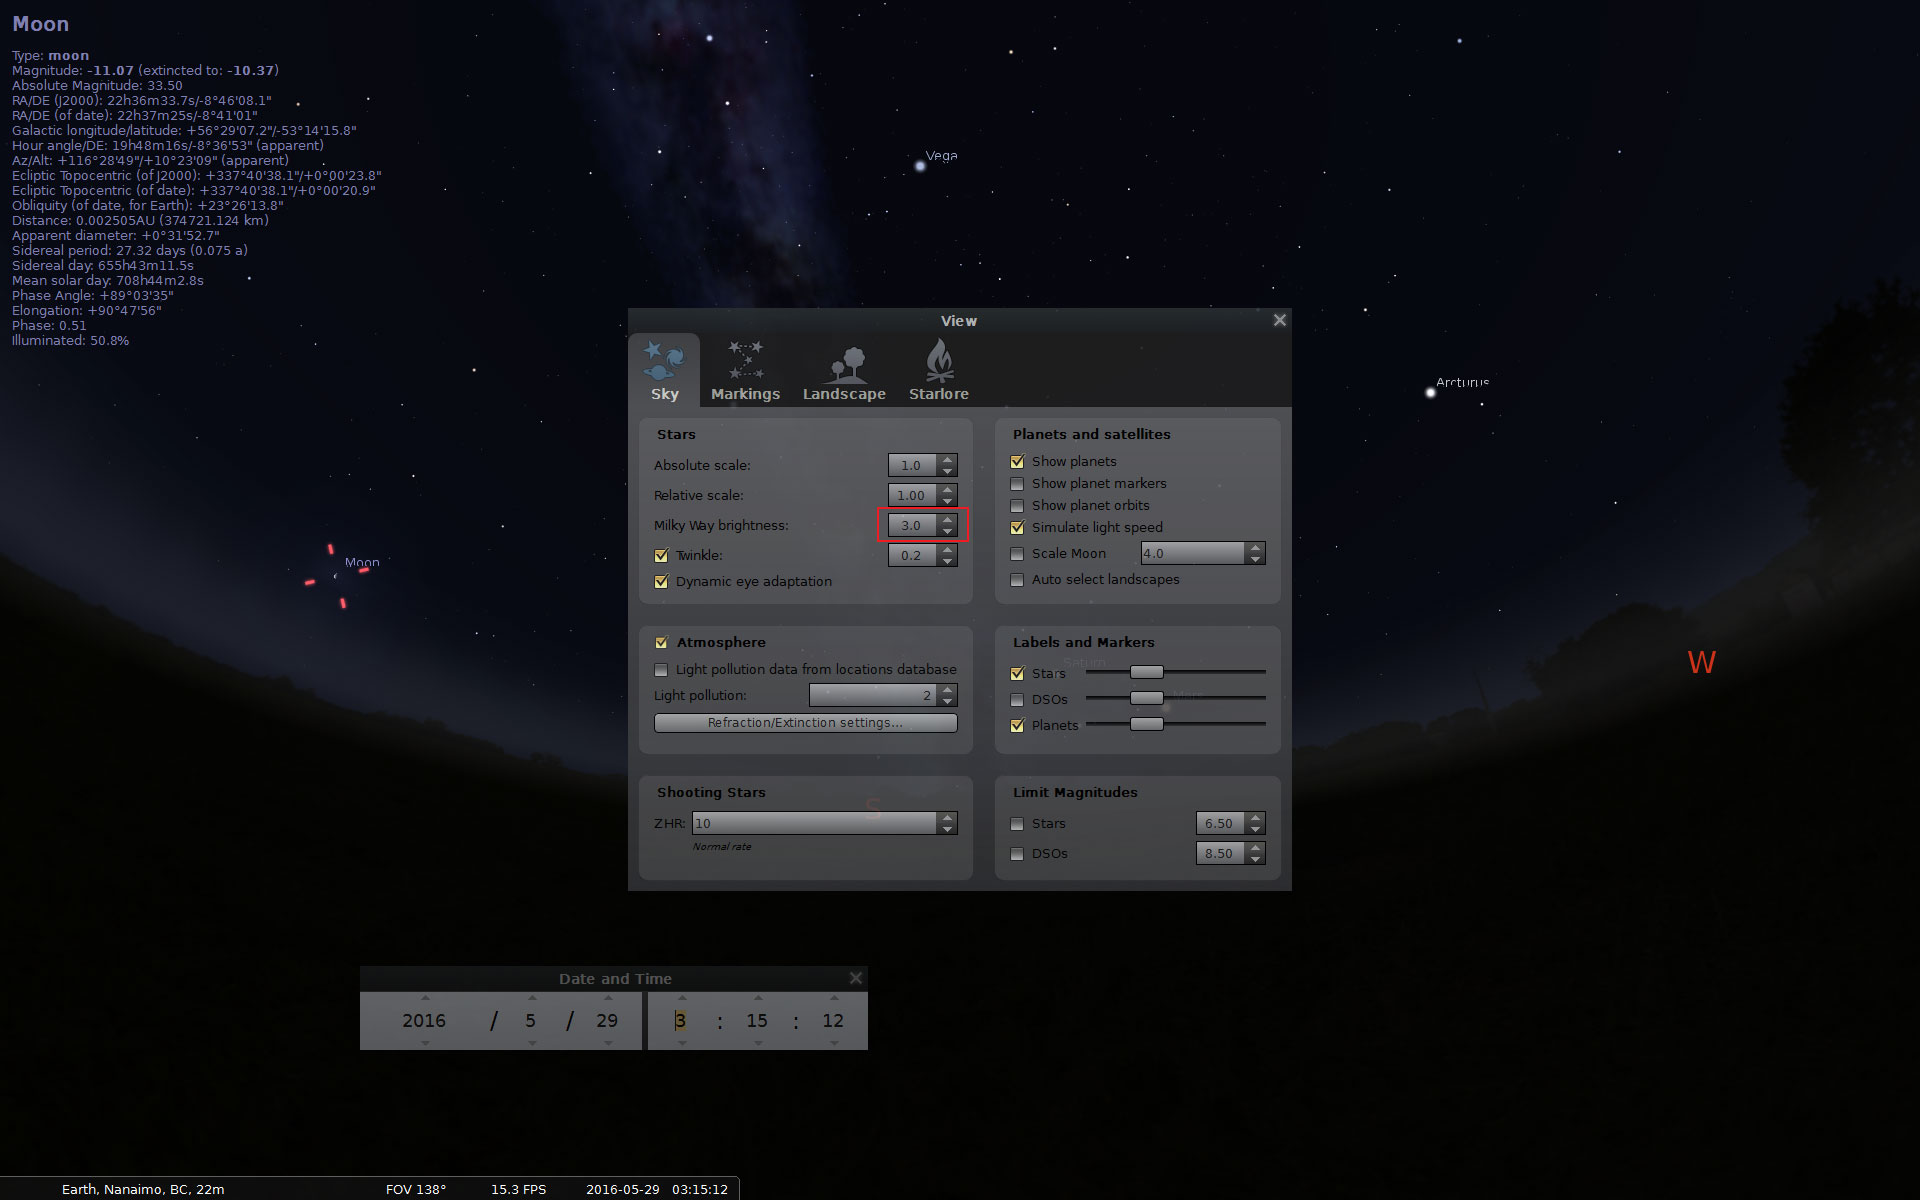
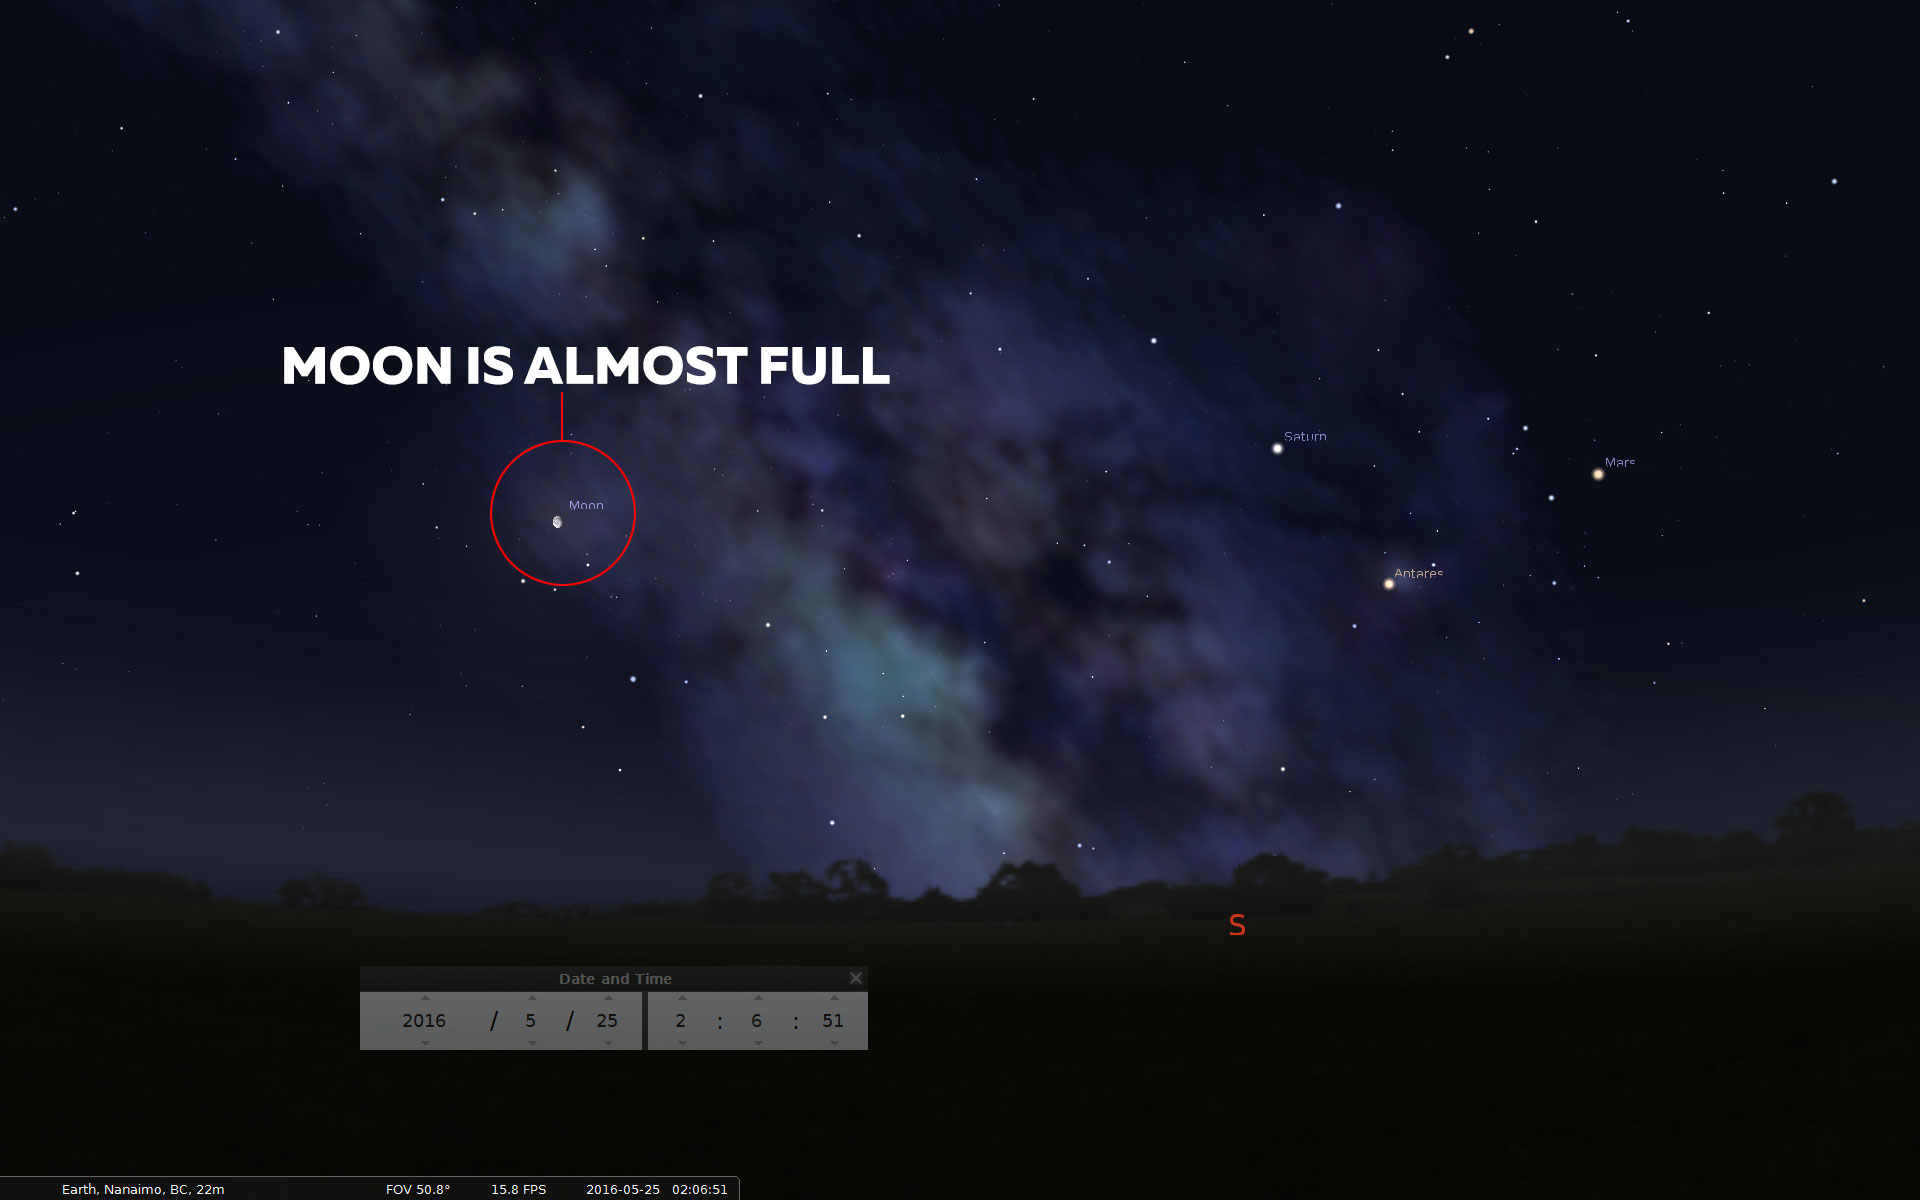
Step 2 – Specify a Date, Time and Location
If you’re in the Northern Hemisphere you’ll typically want to set Stellarium so that it’s facing South. This will reveal the galactic core of the Milky Way. Here’s an example of a location and date that I’ve selected which is clearly going to clash with the almost full moon. As you can see, the moon is very close to the Galactic core and that means the moon will almost completely obscure the brightest part of the Milky Way with all that reflected sun light. That’s not good.
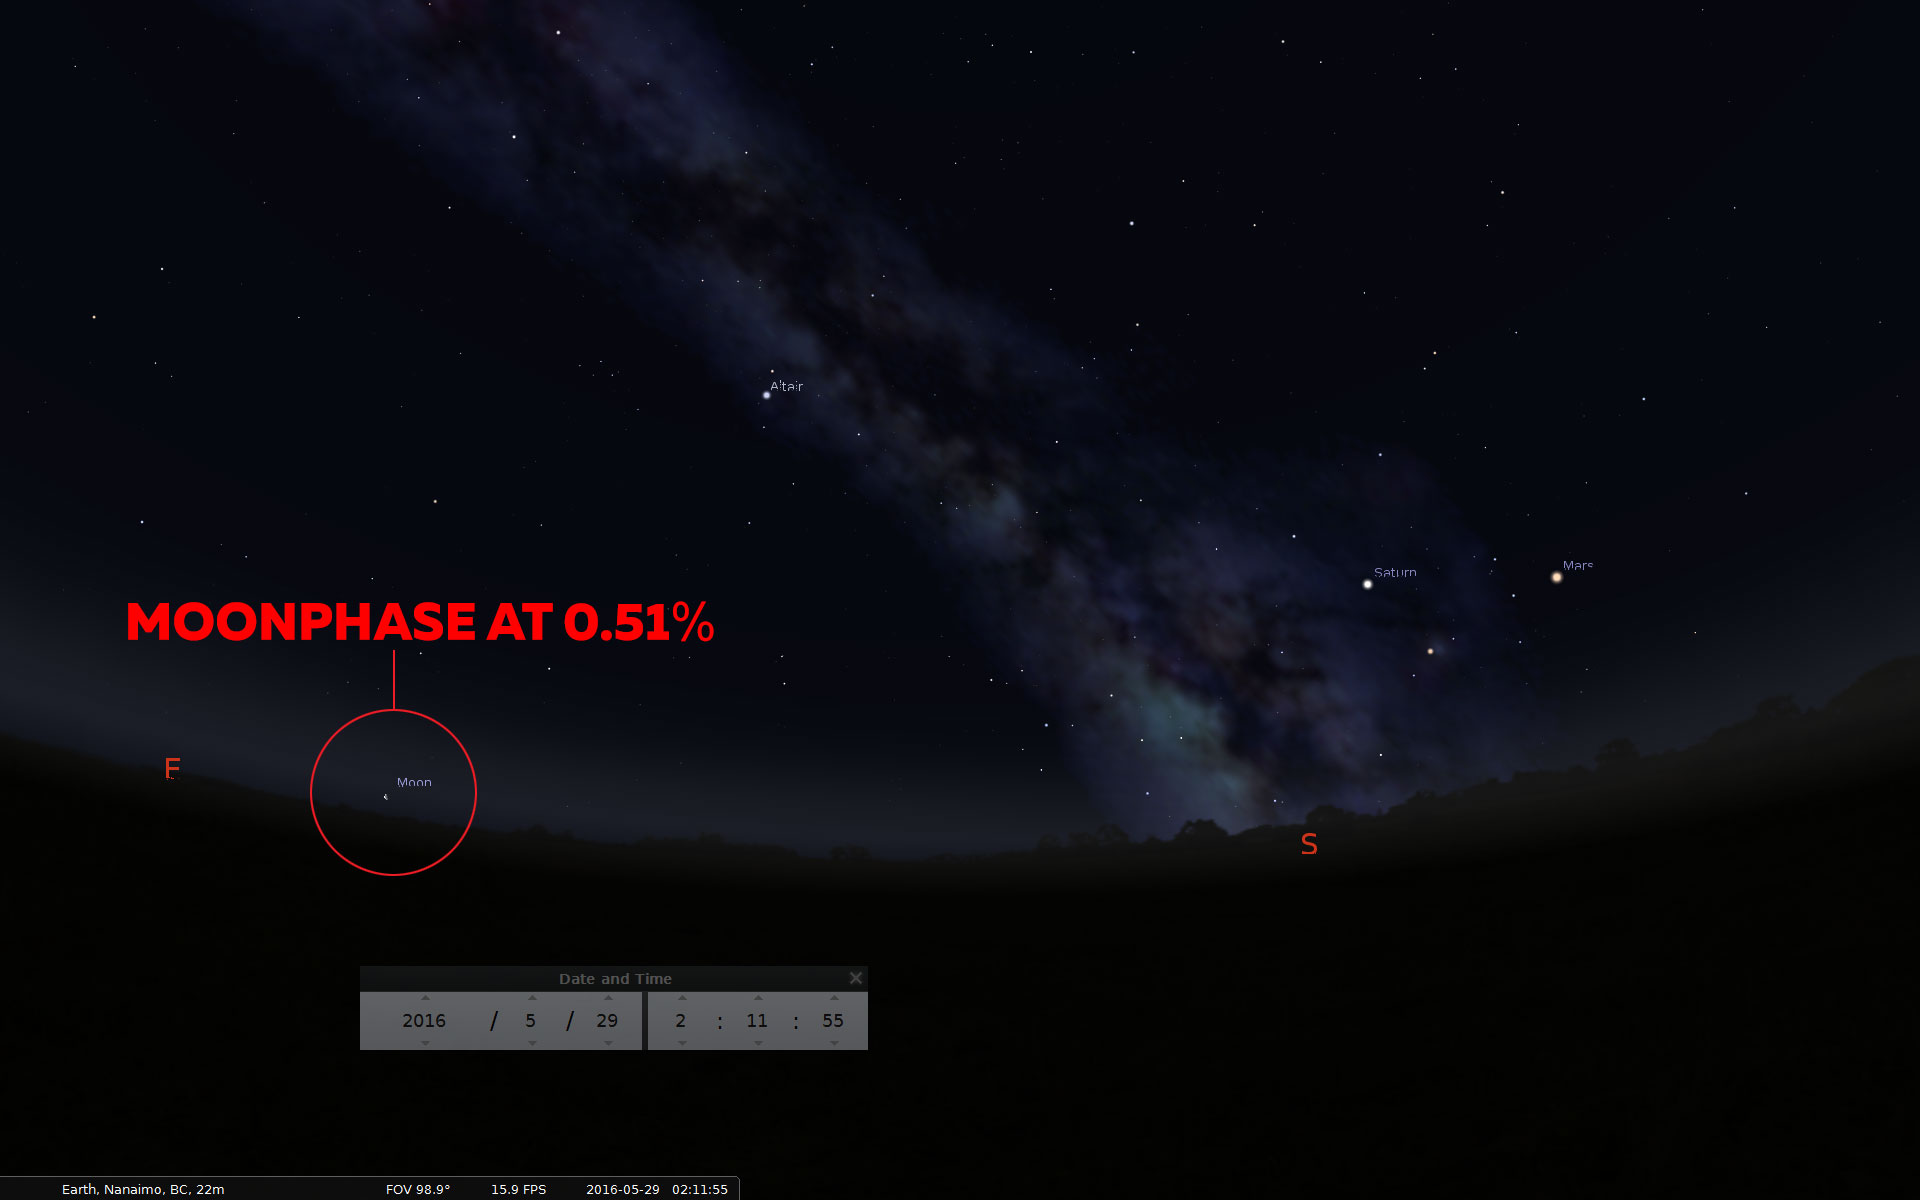
Step 3 – Zoom out and Pick a Better Date and Time
If you zoom out a little (mouse scroll wheel) so that you can fit East and West on your screen, this will enable you to see the changing position of the moon when you change the date. Simply click on the ‘Day’ and ‘hour’ toolbar to move forwards or backwards in time until the moon sits in a better position in the sky – ideally far away from the Galactic core. Stellarium will kindly show you the moonphase, such as waxing, waning, full etc.
Just by moving forward in time by 4 days I can now see that the 29th of June will give me a much clearer shot of the Milky Way and with the moon in the East at 0.51% moonphase, I’ve got some killer side light to light up my foreground. Result!
Dealing With Light Pollution
As I mentioned at the start of this tutorial, light pollution is unavoidable. How much light pollution you’re willing to deal with will determine how far you’re prepared to travel.
I feel that a little bit of light pollution on the horizon sometimes gives a nightscape a nice pop of contrast that enhances the overall composition.
The problem with light pollution is that it causes more noise in our images and that will force us to use more noise reduction and ultimately result in poorer image quality.
Astrophotography requires a lot of compromise. I think it’s great to strive for perfection, but being an astrophotographer means you’ve already accepted the reality that your nightscapes will never have the same pristine image quality as your daytime landscapes.
Go shooting and adventuring. Get creative and experiment with the best places you can find.
If you found this article in any way useful, please spread the word by sharing it with your friends. If you’d like to join my mailing list you’ll be among the first to read my newest articles and tutorials.
I can’t wait to try the app…downloading now! Thanks Gavin!
Thanks a lot for these tips. I have always been drawn by the beauty of night photography. After years without doing any photo myself, I recently started again with a new camera. Having watched more or less all your videos on YouTube I must say that your work inspires me to increase my skills. So I will absolutely try to do more night and landscape photography. I have always thought that conditions had to be perfect for this kind of photos. I will now try even on nights that are less perfect.
Thanks again for all the inspiration you have given me with your pictures and videos.
That’s the spirit Jan. Glad to have inspired 🙂