Abraham Lake Photography Tips – Ice Bubbles and Cracks Where to find and photograph the famous ice bubbles of Abraham Lake
For just a few weeks in the darkest reaches of the Canadian winter, Abraham Lake becomes a spectacular winter wonderland that offers beautiful photo ops for the adventurous photographer. Let me share my knowledge and experience of this magical place in my free ‘Abraham Lake photography tips’ blog post.
When to Photograph Abraham Lake
With these free Abraham Lake photography tips I’m assuming that you’re most interested in the trapped methane bubbles and epic ice formations that occur during the winter. The best time to capture this phenomenon is from mid December to late January. I’d say that there is a 6 week window of opportunity when the ice looks its best.
Arrive too early and the lake won’t be fully frozen, arrive too late and the ice might become opaque and slushy. If you want to be guaranteed the ideal conditions I advise keeping an eye on the weather conditions and keep your travel days flexible.
Don’t go too early. If the ice is thin you’re risking your life and equipment. Wait until the ice is at least a foot thick so that the bubbles have the chance to build up and the deep cracks have the depth to create that fascinating prismatic look.
Don’t go too late or you’ll end up with ice that’s been trashed by ice cleats and mature snow. It’s the snow that really ruins the best looking ice because if it gets enough time to fuse with the surface it will turn the ice opaque and has a rough texture. It’s still quite pretty when this process just starts to happen but it can turn ugly in just a few days under certain conditions.
Where is Abraham Lake?
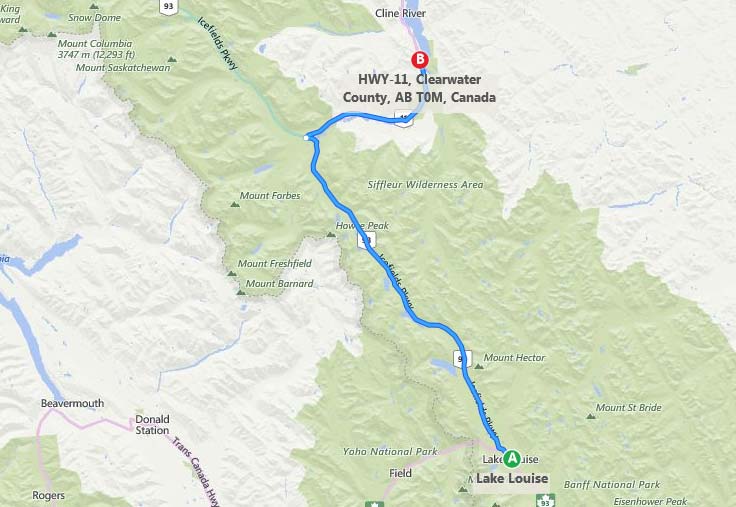
Abraham Lake is about a 1.5hr drive North of Lake Louise in Alberta, Canada. It’s just outside the boundaries of Banff National Park. The most popular route is from Lake Louise where you’ll head North along the ‘Icefields Parkway’ towards Jasper. At Saskatchewan River Crossing take a right turn on to Highway 11 towards Nordegg. Preachers Point is your first stop which you’ll reach about 30 minutes after making the turn on to HWY 11.
Most people that visit Abraham Lake from outside of Alberta tend to stay in Lake Louise as it is much closer to the lake than Calgary or Edmonton.
Ideal Weather Conditions for Abraham Lake Photography
When it comes to photography at Abraham Lake, you’re looking for specific weather that’s going to give you the ideal ice conditions. For that you’re going to want to avoid arriving after a heavy snow fall.
The good news is that Abraham Lake is infamous for its high winds, so even after a couple of days of heavy snow you might still get great ice conditions if those snow days are followed by a couple of brutally windy days. The ideal conditions in bullet points would be;
- No Snow for a Few Days
- Windy but not TOO windy
- -10 °C to -20 °C temperatures to avoid melting
- Partly Cloudy Skies for Sunrise/Sunset
- Clear skies for astrophotography
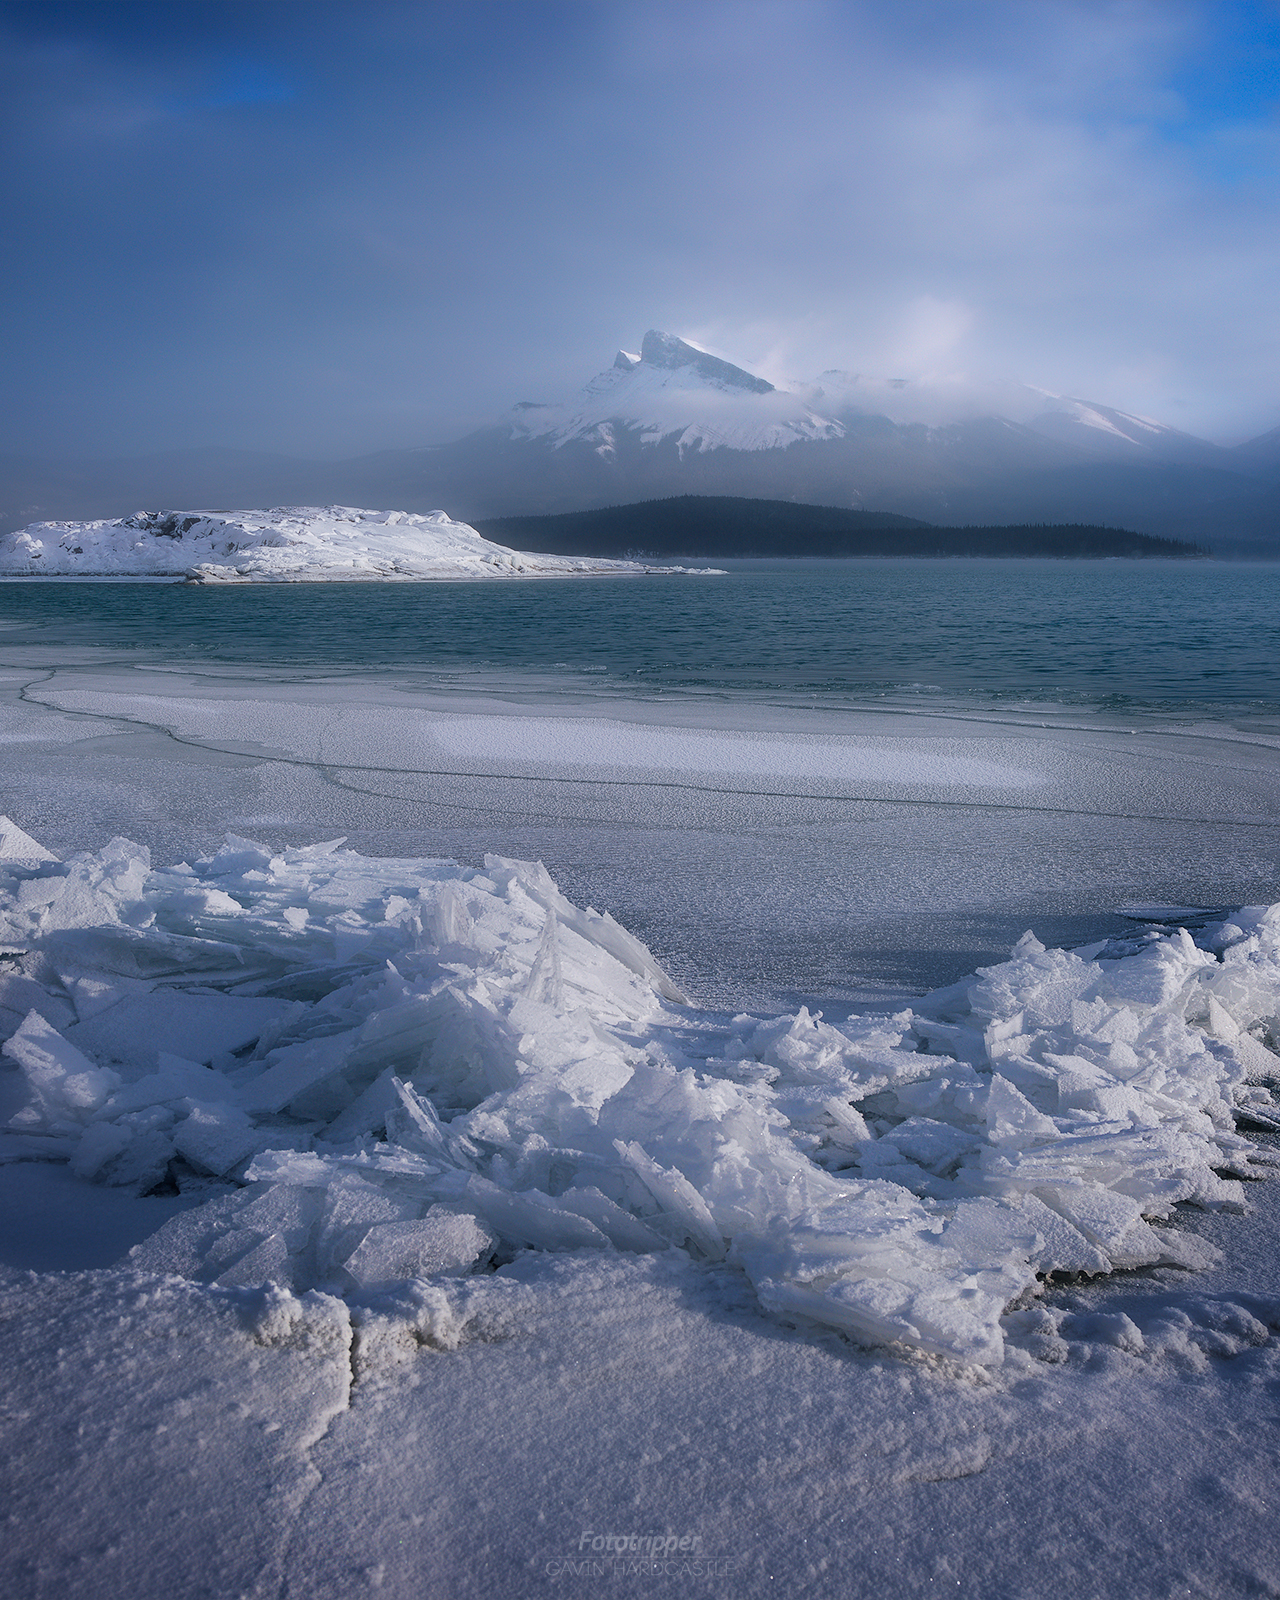
Those high winds are both a blessing and a curse. The blessing is that the wind blows away any snow and also leaves the surface of the ice like a highly polished mirror. The bad news is that it can get so windy out there that you’ll have major challenges capturing sharp images, not to mention the hellish temperatures.
I’ve been at Windy Point during -29 °C conditions with all of my winter gear on and I just wanted to quit. At those temperatures the high winds at Windy Point will break the spirit of even the most hardy photographer.
Melting isn’t a Disaster
I’ve been out on the ice after a spell of warm weather and the melting can actually create some gorgeous pools on the surface of the ice (see video below) . This is great when the ice is melting without any snow on the top but if a warm spell triggers a melt after the snow has settled it will make the ice look like a slushfest. Again, keeping an eye on the forecast will save you a wasted journey.
The video below shows me standing on thin ice that’s about 2 inches thick. A recent thaw had changed the landscape drastically from the week before. You can see the trapped methane bubbles making their way downriver under my feet. I wasn’t worried because the water was only about 6 inches deep under this stretch of ice.
Where to Photograph Ice Bubbles at Abraham Lake
While the entire lake has many stunning vantage points, the two most popular locations are Preachers Point and Windy Point. If you’re arriving from Saskatchewan River Crossing as most people do, you’ll see Preachers Point first on the right. The sign is pretty small and you might not be able to see it clearly with all the redneck bullet holes on there.
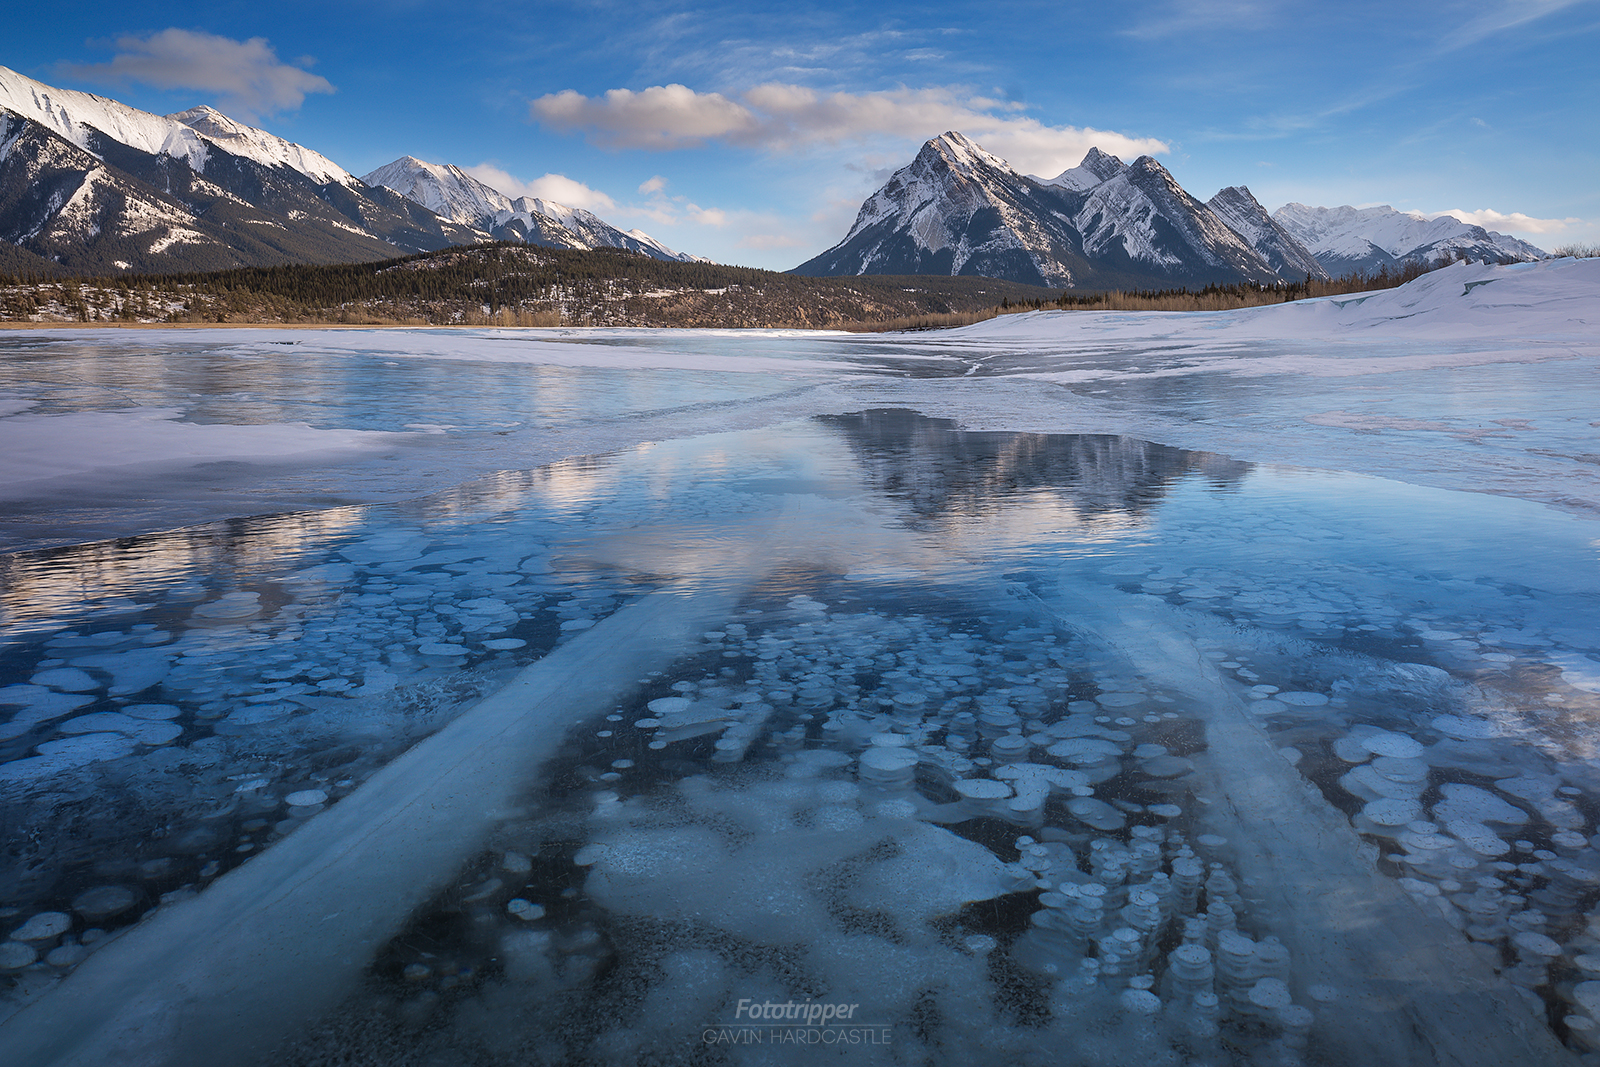
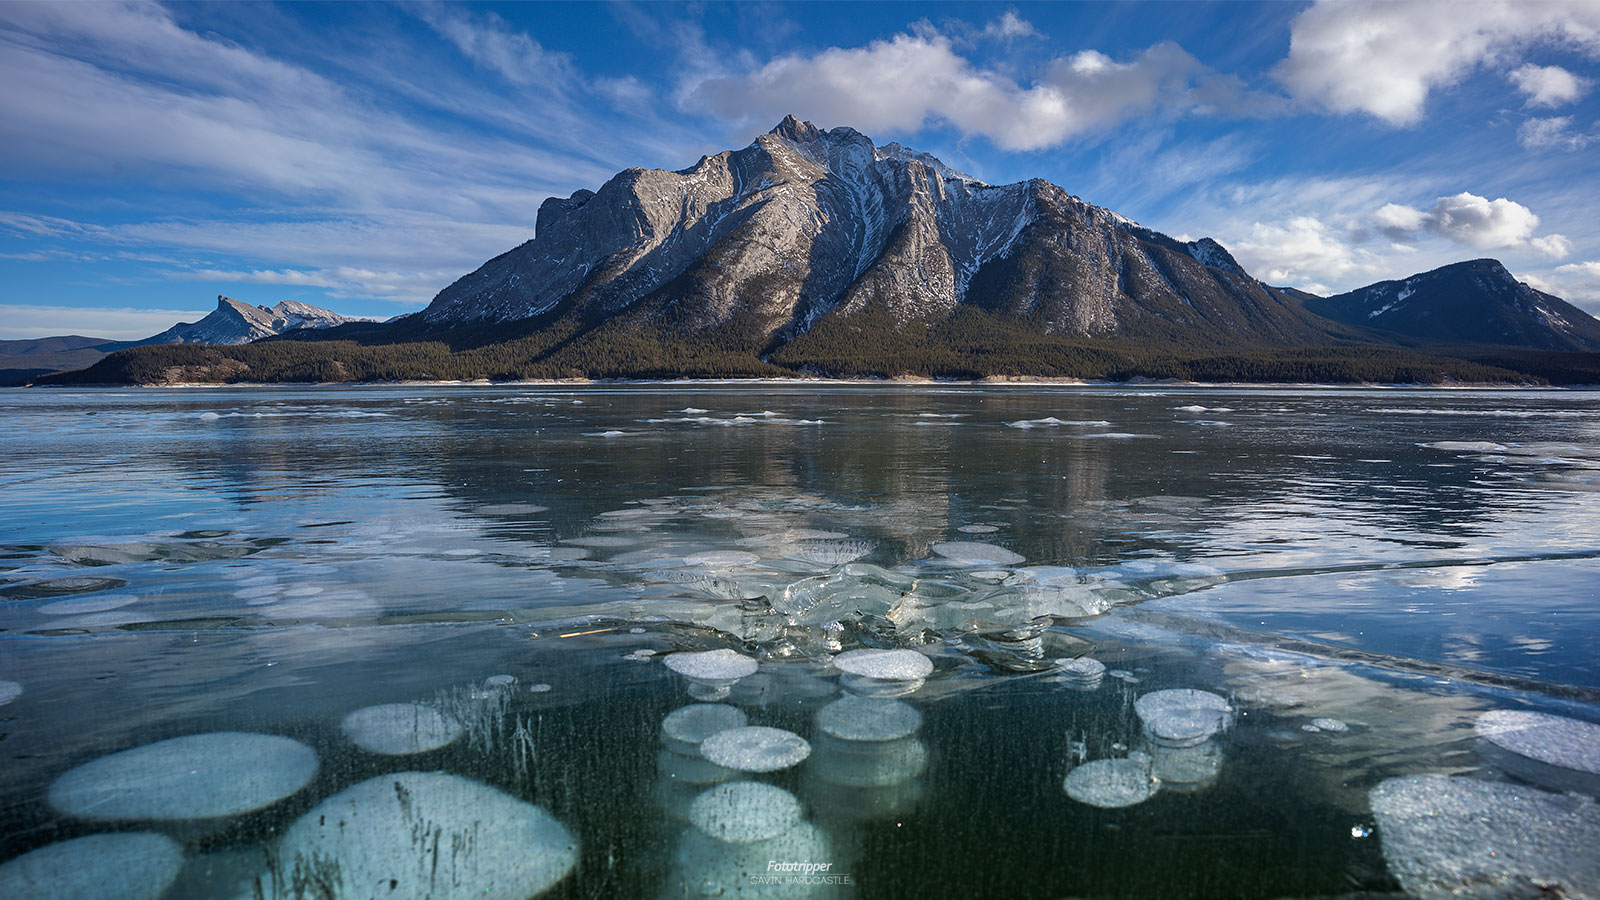
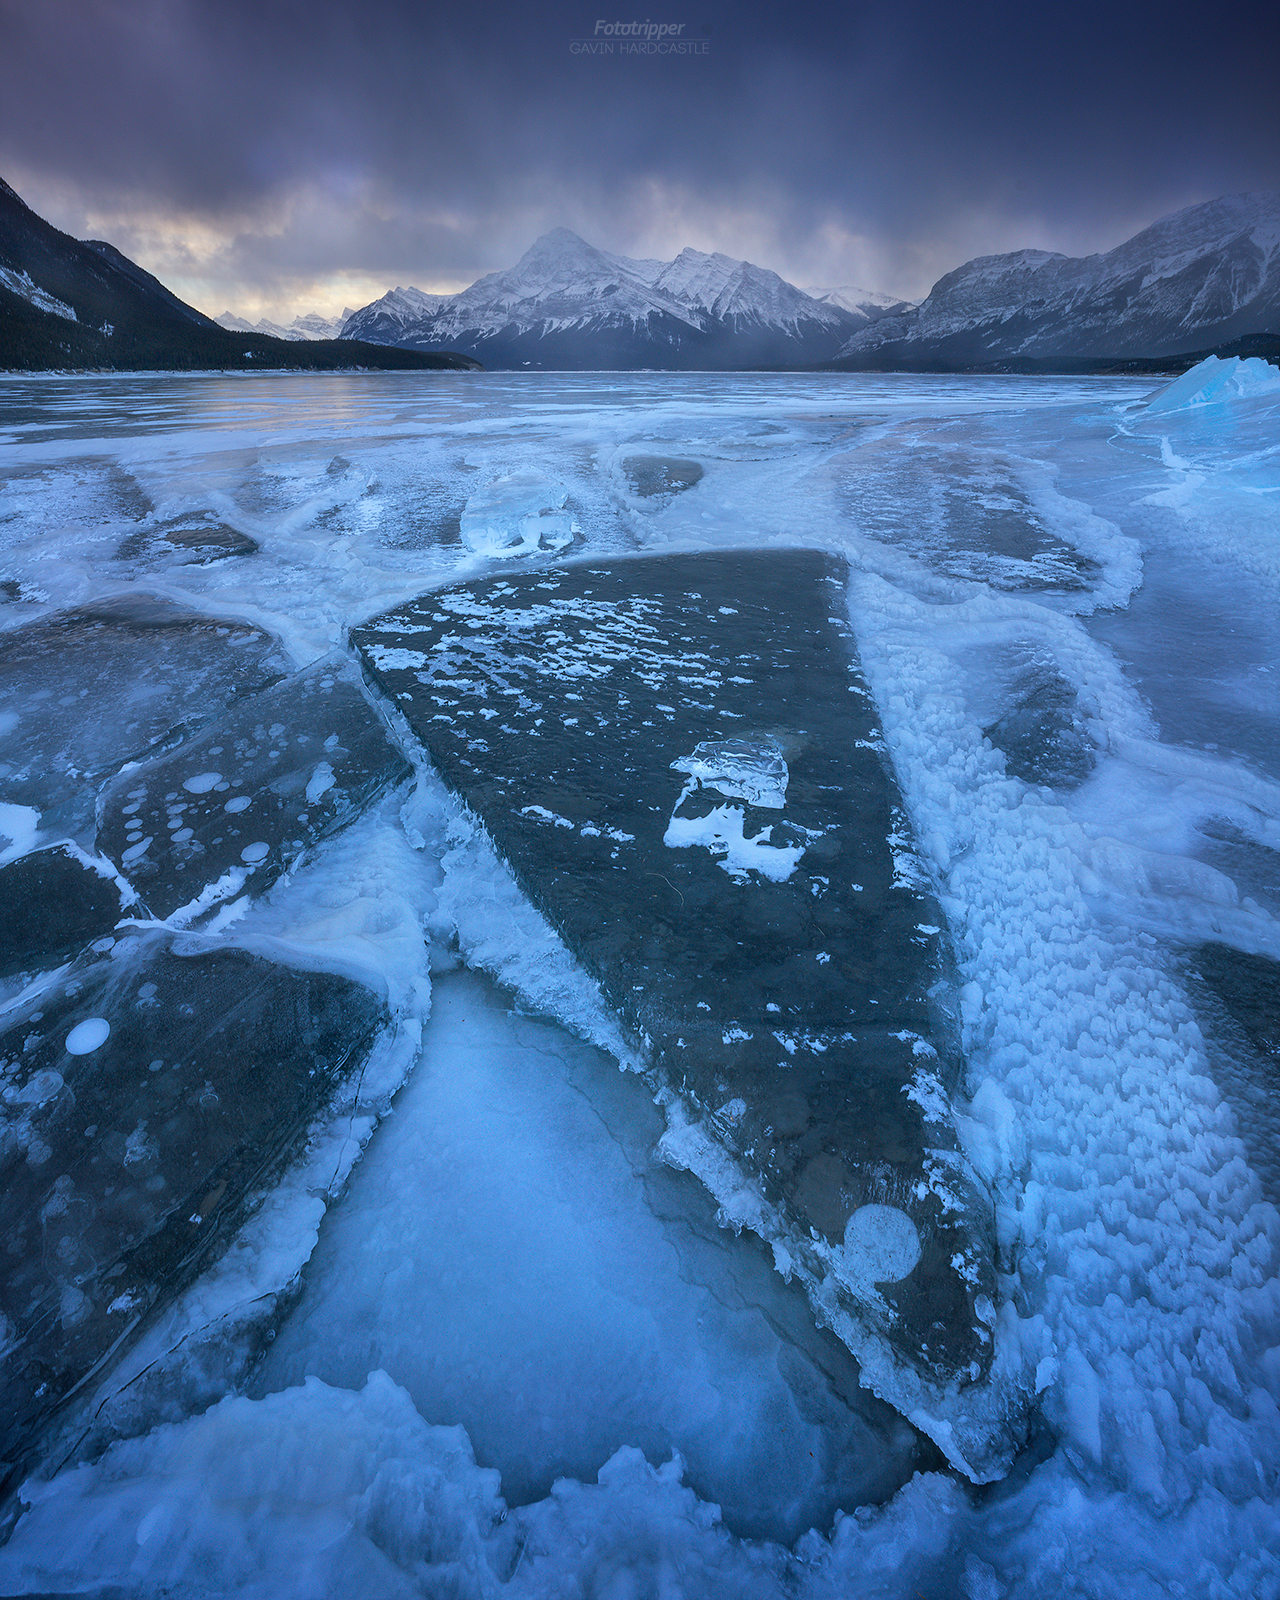
The other popular spot is Windy Point which is further East along the lake on the way to Nordegg. There are various roads down to the lake shore so it depends which peaks you’d like to feature in your photos. Mt Mitchner (pictured above) is the most impressive peak near Windy Point and there are many spots along the beach where you can feature Mitchner in your shots. For Mitchner I recommend a super wide lens like a 16mm on a full frame camera.
If you want to get pure bubble shots where the mountains in the background are less important, you’ll find some amazing bubble stacks near the boat launch that sits about halfway between Windy Point and Preachers Point. There is no sign, just a dirt road (one of many) that lead down to the beach.
Amenities at Abraham Lake
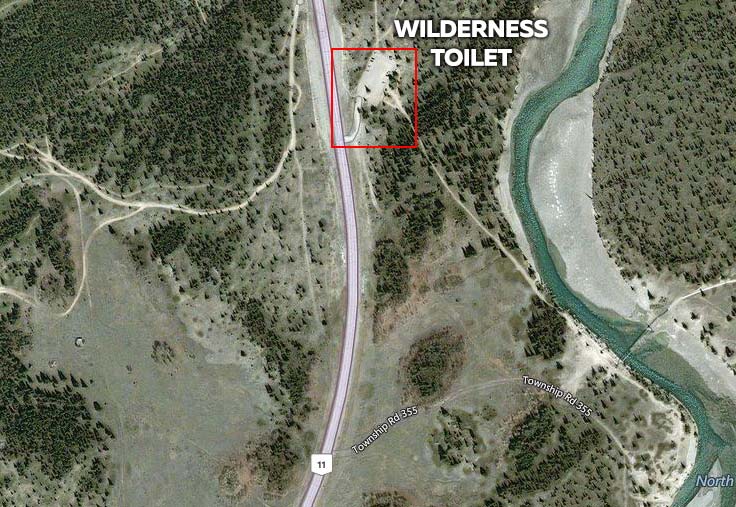
Abraham Lake is not a Provincial park so there are no toilets on the lake itself. There is however, a decent public toilet just before you get to Preachers Point in the car park just after Township Rd 355. It’s about a 5 minute drive South of Preachers Point. If you’re driving North and you see ‘Kootenay Plains Ecological Reserve’ on the left you’ve gone to far. Turn around, head South and keep an eye on the left.
In the winter you can forget the resort at Saskatchewan River Crossing as it closes all winter. The closest place to get food, fuel and accommodation is Nordegg. Which is about a 20 minute drive North East of the end of Abraham Lake. You can also get accommodation at the hostel at Rampart Creek but that’s a 45 minute drive West along the Icefields Parkway. You can book a space on Expedia. After that it’s all the way back Lake Louise for services and places to stay.
What to Bring to Abraham Lake

I know I already mentioned that it can get painfully cold at Abraham Lake but I’ll mention it again. Having the right tools for the job will make your visit to Abraham much more enjoyable and it will allow you the freedom to capture some great images. Here are the essentials;
- Hardcore Winter Clothing with thermal under layers.
- Thick Winter Gloves. Either wear thin gloves that fit inside larger mits or buy those snipers gloves that are basically giant mits that open up to reveal smaller fingered gloves on the inside. These are not cheap but are absolutely brilliant for subzero photography. We paid about $200 per pair and they made winter shooting a lot easier. Be sure NEVER to get snow trapped on the inside though or you’ll quickly end up with soaked gloves that will freeze solid.
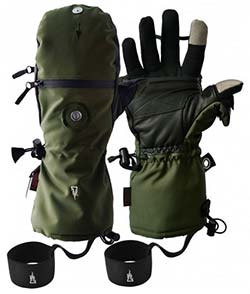
Search for ‘The Heat Company Austria’ for these gloves - Hand Warmers to put inside your gloves
- Hand Warmers for your batteries. Because I’m a Sony shooter I’ve become accustomed to seeing the words ‘Battery Exhausted’ every time I switch on my camera. If I’m careless enough to leave my camera bag open to the elements (which I sometimes do) all of my spare batteries will quickly become useless bricks. I’ve taken to placing them all in a lens pouch and dropping a couple of hand warmers in there once I begin shooting. That keeps them toasty for hours even at -34 °C – if I remember to close my camera bag.
- Foot warmers. Don’t buy those crap toe warmers, get the full insoles that warm your entire boot. These are so effective that they almost become unpleasantly hot but you’ll adore them when it’s super cold. In fact these can mean the difference between shooting for hours or just quitting to avoid frost bite.
- Face Mask – When the hellish wind blows in your face the mask will save you from frostbite and quitting.
- Proper Ice Cleats. Don’t think for a second that shoddy ice cleats will save you from going belly up on the ice. You’ll need to spend at least $60 on a good pair of spikes that really grip the ice. Many of the lakes ice surfaces are sloped so you’ll need excellent grip to avoid painful and shameful landings.
- Tripod Spikes – Did I mention it gets windy? Bring your heaviest tripod, ideally with one of those weight hooks so that you can attach a heavy bag to keep the tripod stable. Rubber footed tripods will enjoy a nice long skate across the ice (see video below) so screw on some spikes and dig them into the ice to keep things locked down.
- Image Stabilization – If you’re doing long exposures you’ll really benefit from having image stabilization either on your lens or sensor. No matter how well you’ve secured your tripod you’ll still end up with a blurry shot if the ice is vibrating like a paint mixer.
- Battery packs – aside from your spare camera batteries I recommend you take one of those large USB charger packs so that you can charge your batteries and devices.
- AWD vehicle fitted with winter tires. If you’re flying in be sure to ask your car rental company if you can hire a car with proper winter tires and AWD. The stretch of road from Lake Louise to Saskatchewan River Crossing is notoriously sketchy and I’ve seen many a crappy rental car in the ditch during winter.
Where to find cell coverage
The Icefields Parkway and most of Abraham Lake doesn’t have cell coverage but you should find a sweet spot about a mile from Windy Point and then right at the car park for Windy Point.
Breakdown Coverage
Pretty much the only people you’ll see out there are photographers and they only usually stick around for sunrise and sunset. If your car breaks down and the temperatures become arctic, you’re potentially in a lot of trouble. I’ve slept in the car out there overnight a couple of times and even my fat mans girth couldn’t keep me warm enough. Any liquids or foods in your car will quickly freeze solid so it won’t take long for your body to follow suite.
Your worst case scenario is hiking all the way to Windy Point where you’ll get cell coverage. It’s doable but not recommended. If you want a strong chance of avoiding total disaster out there I advise you travel with a friend in two vehicles. That way you can deal with the breakdown without hypothermia AND continue shooting. This is a policy I enforce on all of my photography workshops because ‘the show must go on’.
Sunrise vs Sunset
If you want to catch some nice Alpenglow in your photographs you’ll find that sunset is best as Mt Mitchner can often catch some nice light from the setting sun. Sunrise will mean back lit mountains with a rare possibility of light rays bursting out of the tops of the peaks – if you’re lucky.
Abraham Lake Photography Tips for Creativity
So far I’ve not touched on the ways you can get really artistic and creative at Abraham Lake so here are my Abraham Lake photography tips for creativity so that you can make the most out of your visit.
- Exploit Lens Distortion – If you’re shooting with a super wide lens you’ll really want to use that lens distortion to your advantage. When shooting verticals I recommend really playing around with your lens positioning in order to make the mountains in the distance appear much taller. By placing them in the top quarter of your frame you’ll really see the difference.
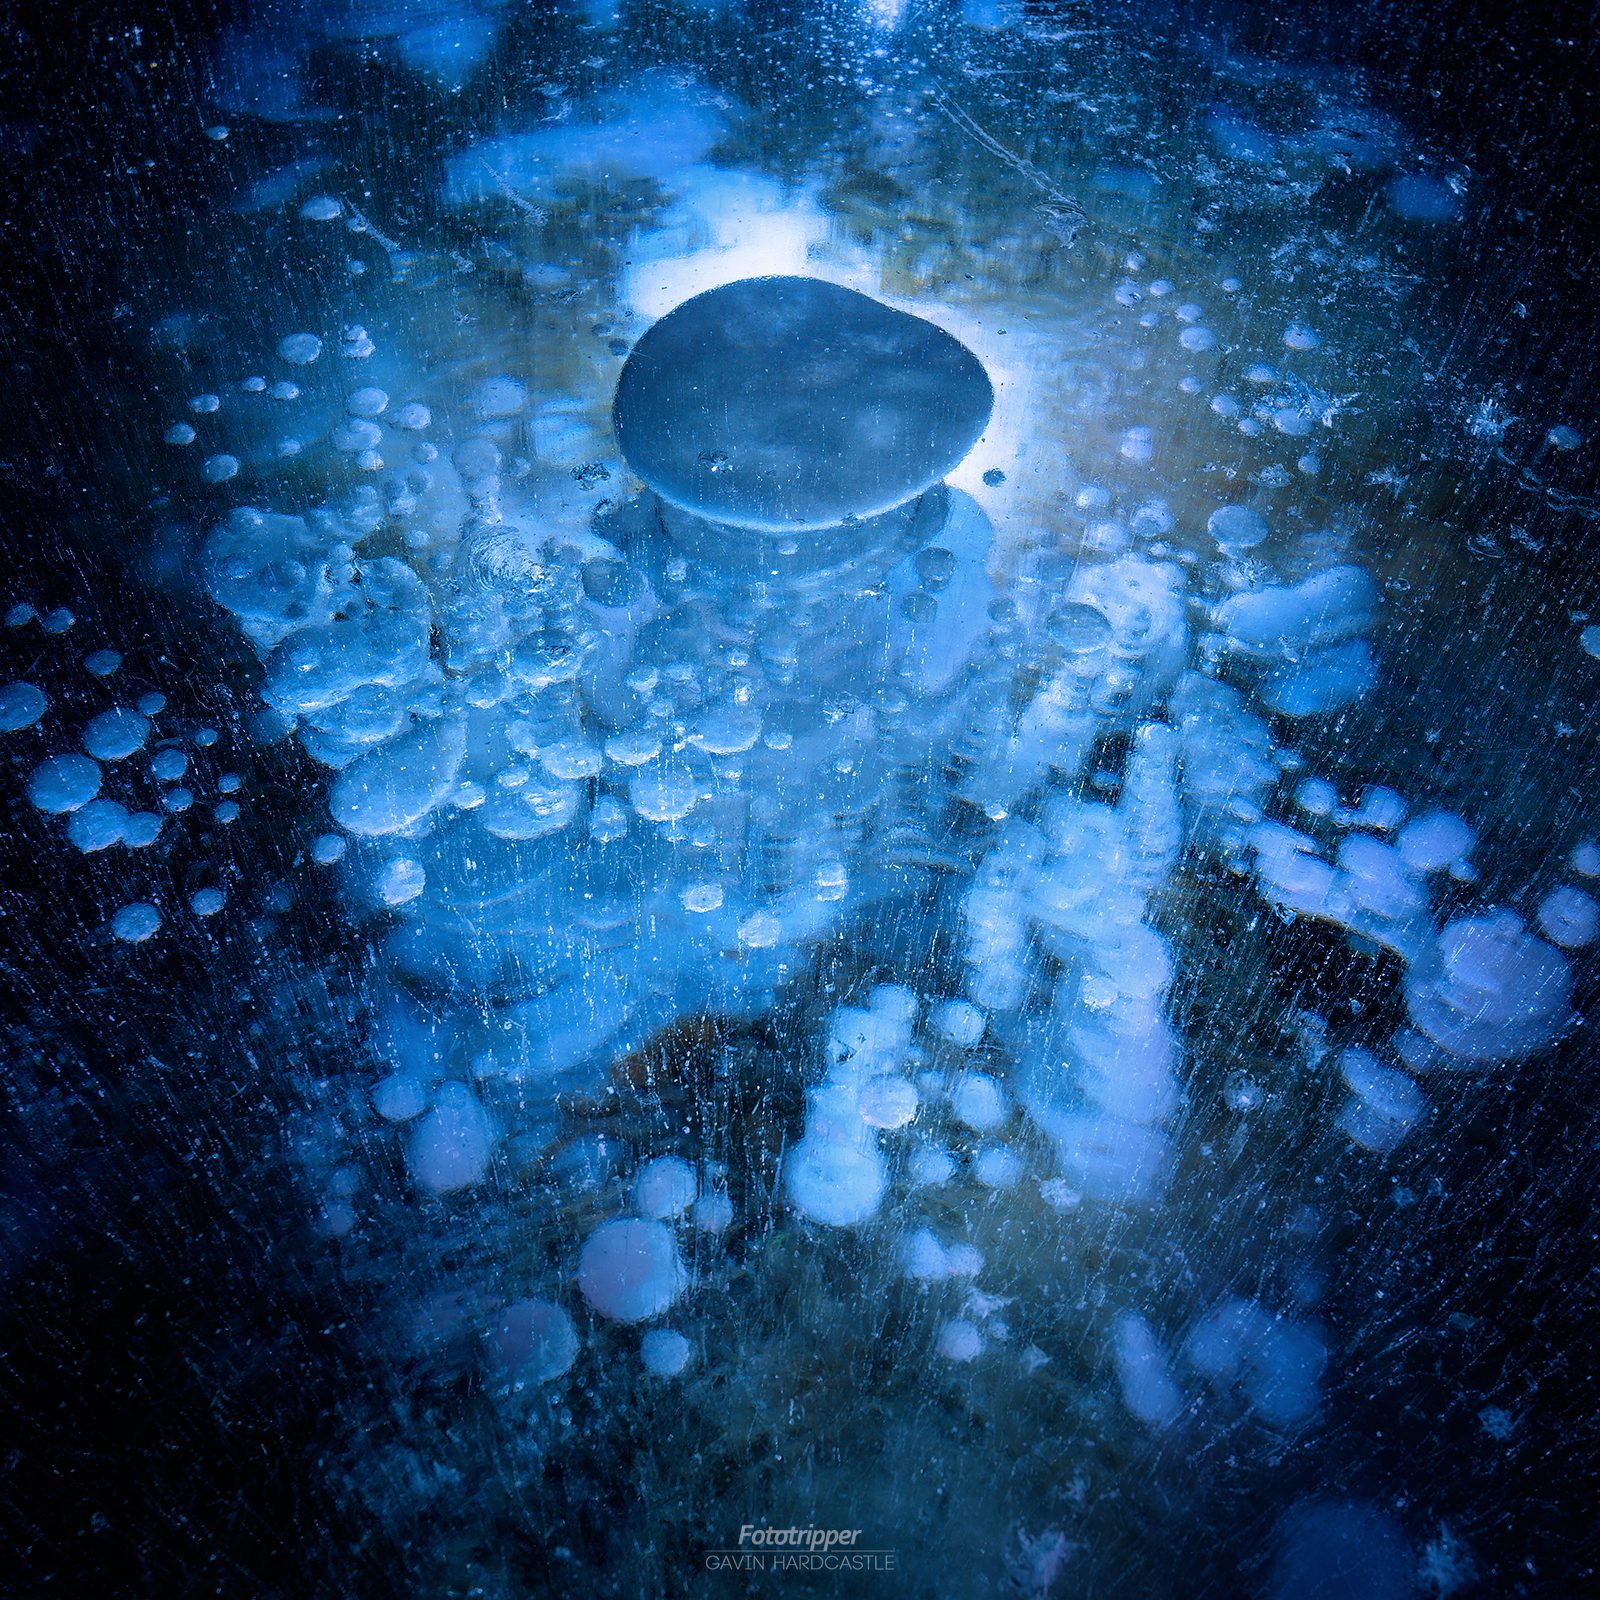
- Get Low to the Ground. You can really magnify those amazing cracks, bubbles and frost shapes in the ice by getting down nice and low and exaggerating those fascinating features.
- Ditch the Polarizer – You won’t often hear me say that but when it comes to maximizing those gorgeous reflections you’ll find they really POP when you don’t use a polarizer.
- Focus Stack for Maximum Depth of Field. At the very least you’ll want to stop down to f/16 or even f/22 to catch as DOF in your scene as possible. The best method is to focus stack and carefully blend them later in Photoshop for the ultimate sharpness from front to back.
- Search for Shapes to Frame Your Shot. It’s not all just about ice bubbles at Abraham Lake. The cracks, gaps and holes in between ice plates offer some amazing foreground elements. Use them to frame the mountains, clouds and scenery.
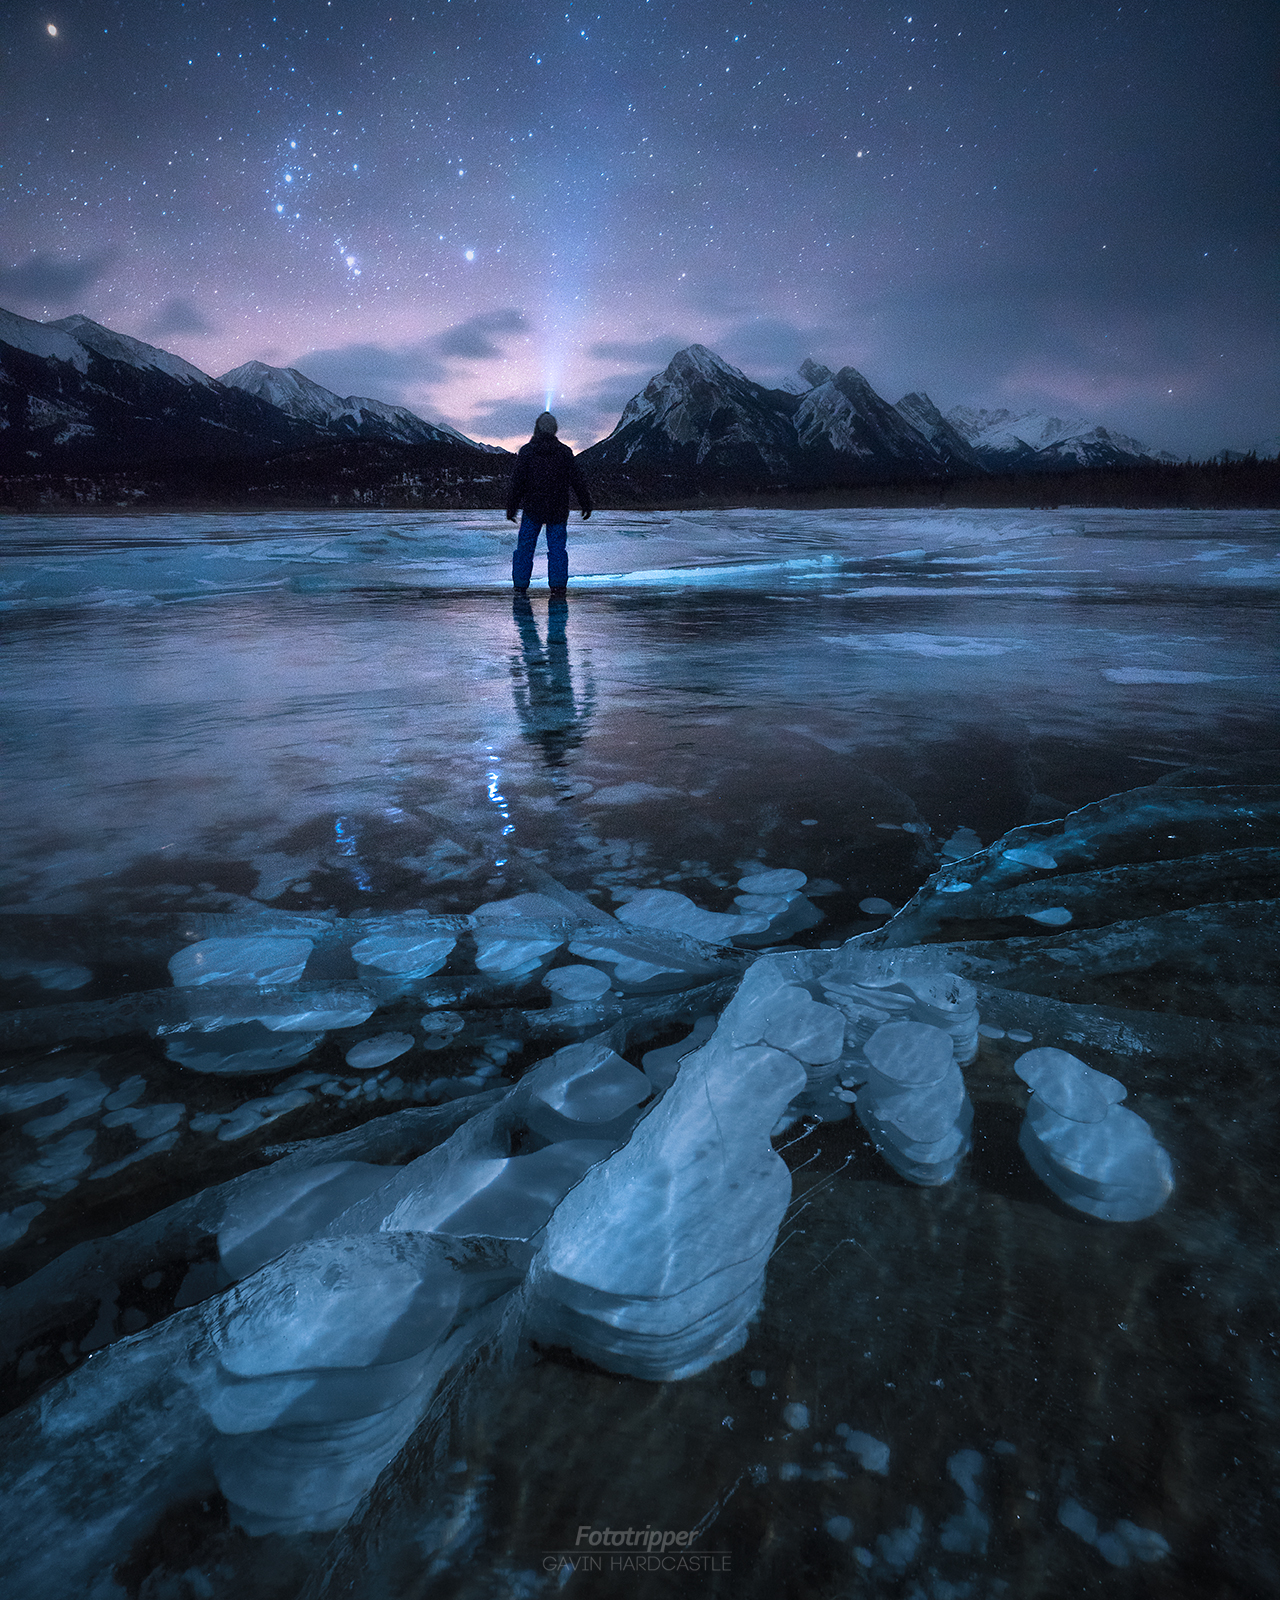
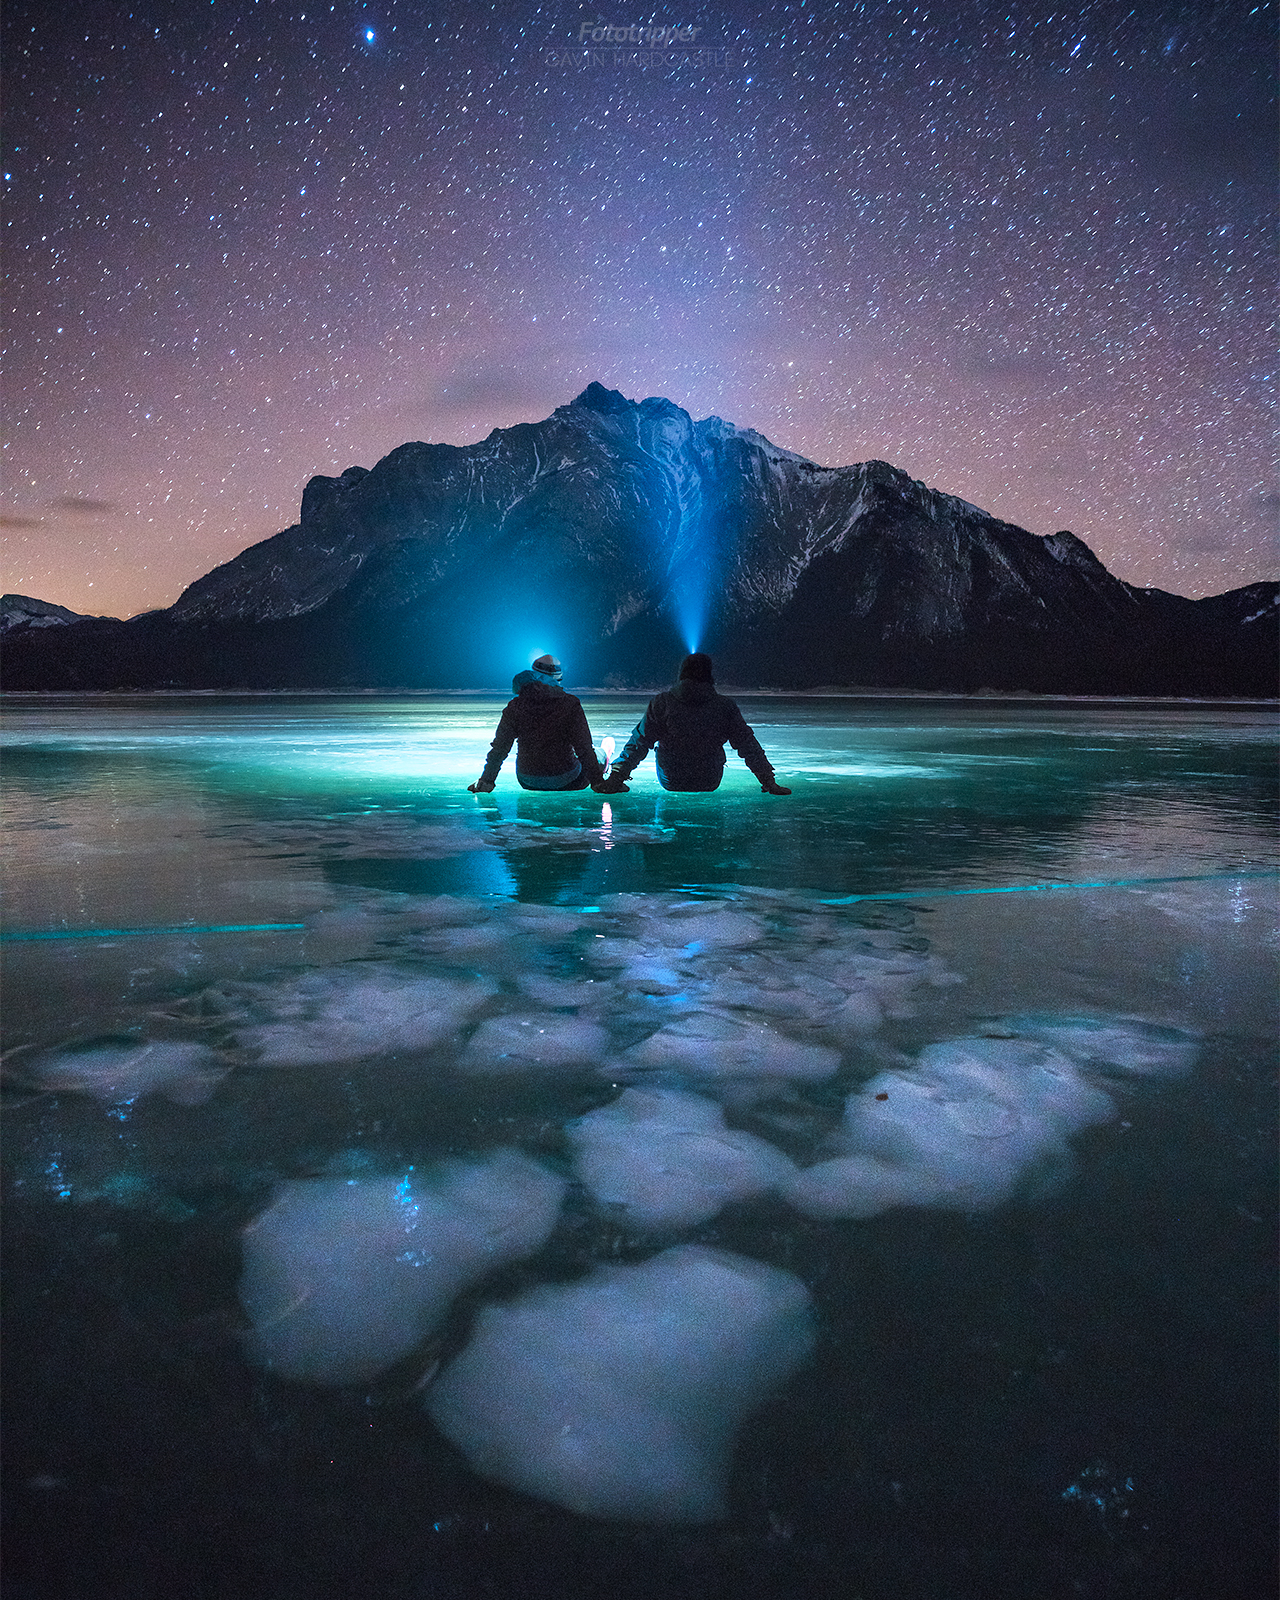
- Put people in Your Shot. It’s sometimes cool to include humans in your images even if it’s just for scale.
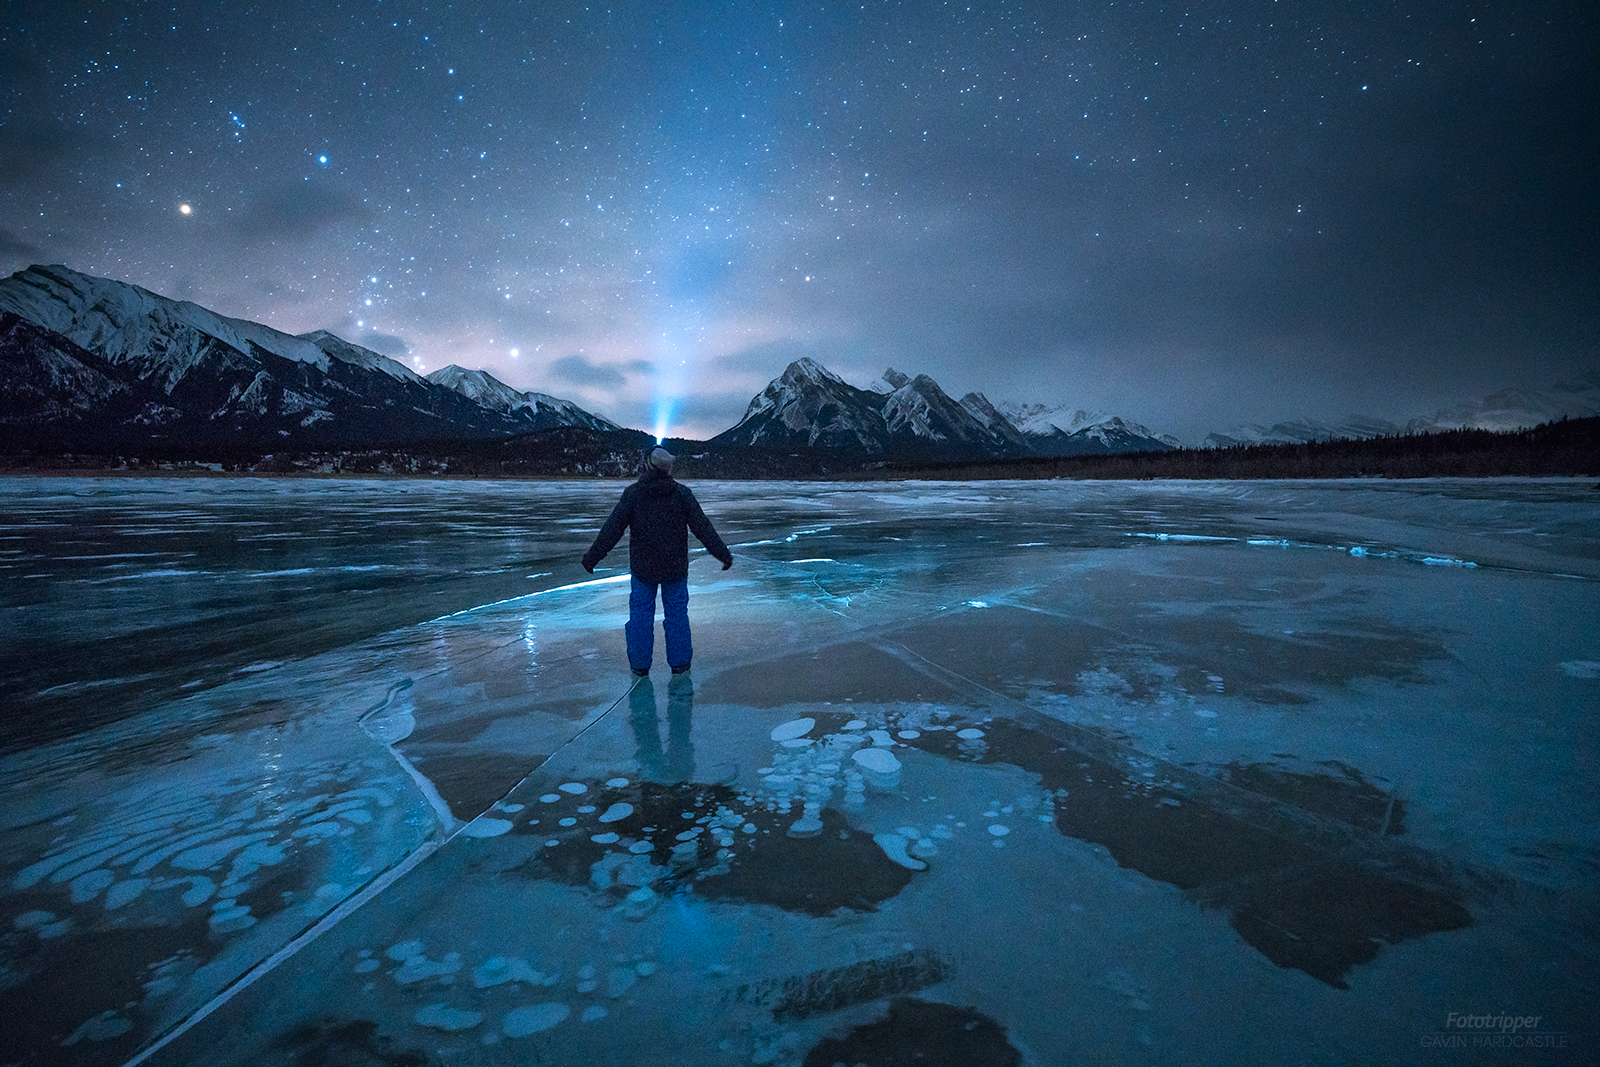
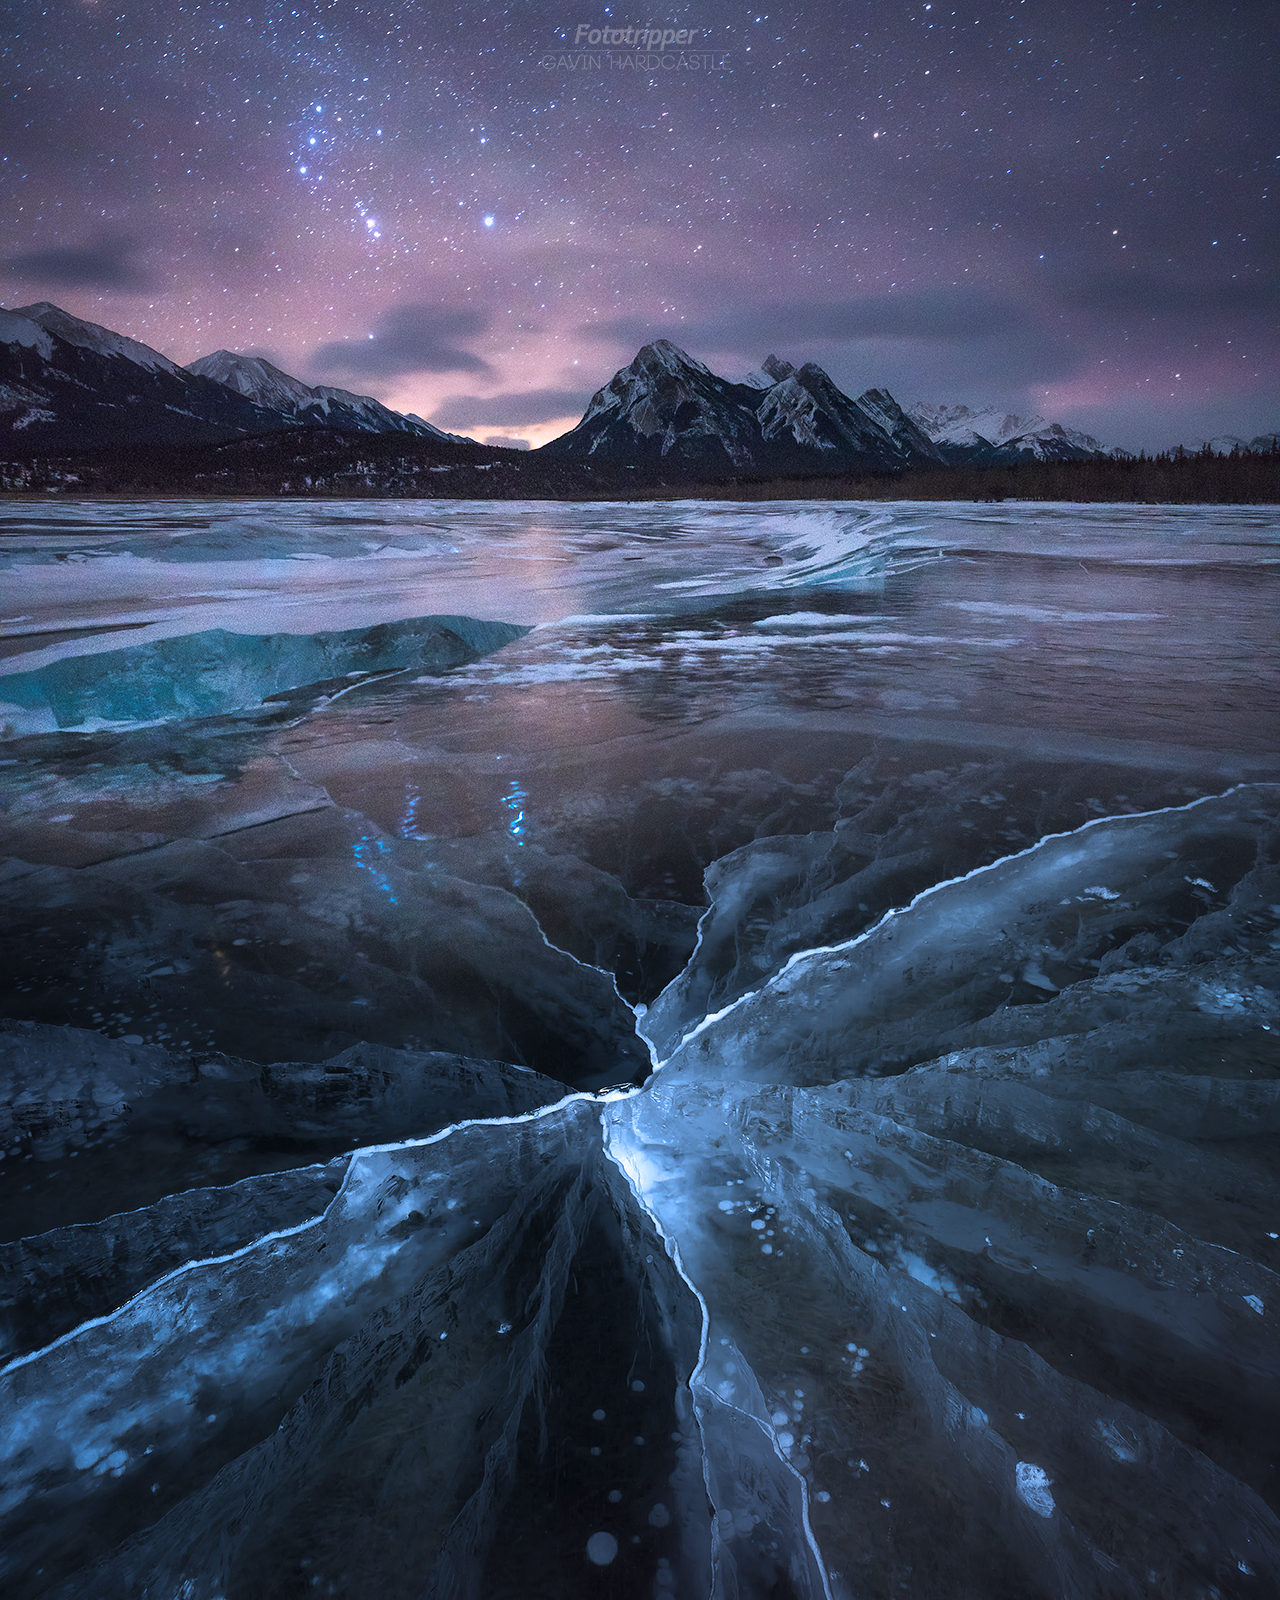
- Go at Night – Orion rises in the South East and while it can’t quite compare to the majesty of the Galactic core, it’s still pretty beautiful and will reflect nicely in the ice. There’s also a chance of catching the aurora and you can have fun light painting the cracks and bubbles without the gangs of tripods that turn up for sunset.
Got Questions?
I really hope you enjoyed my free Abraham Lake Photography Tips. I’ve spent a huge amount of time freezing my giblets off out there and I managed to capture some nice shots while exploring. If you have any questions please post a comment below. I’ll do my best to reply with something helpful.
If You Liked This Article
If you liked my Abraham Lake photography tips and the images in this article you can find two Photoshop Video Tutorials explaining exactly how I processed some of these shots.
Thanks for reading 🙂
Hi Gavin, you mentioned about an Abraham Lake workshop, as well as a Banff workshop in Q1/2018, but neither link works. Please let me know if you plan to do either, and the specifics. I assume you are in Scotland now, so I will be patient and wait for your response when you get a chance.
Thanks and regards,
Roy Prasad
Hi Roy, I’m afraid neither of those workshops will be happening. Are you on the mailing list for the latest news?
Hi! How do you recommend measuring the thickness of the ice? That would be our main problem as we will be flying in. Thanks!
As in – you’re worried about falling through? You just have to use your judgement. Go in the daytime so you can get a good look at it. Many places only have earth directly under the ice so even if you broke through you’d be fine, other places are deep and you can easily tell those because you can’t see the bottom.
Hi Gavin-My wife and I are outdoor enthusiasts so would love to see the bubbles. Thank you for such an enlightening, comprehensive article!! (P.S. of course I will bring my camera and skates)!
Jim
Hello Gavin, amazing work! Will you ever consider doing a workshop in Alberta again!? Is there a way to subscribe to your work for any updates? Thank you for your time and dedication!
I’d consider going back to AB for a private client that booked a few days 😉 You can subscribe to my newsletter here https://www.fototripper.com/newsletter/
great picture !
I want to go if I have a chance .
where is the best near place to stay from Abraham lake ?
which month is the best month to shoot a sunset or sunrise that blends in with snow ?
the ice bubbles are great.
thank you
This is so unbelievably helpful, thank you for taking the time to be so informative! I’ve been on some other sites and they do recommend certain things, but really gloss over them instead of going into detail and stressing why its important to get the right stuff. I’m planning on this either this or next year, either way I’d better get buying (gloves, spikes, etc.) Thanks again.
You’re welcome. Be safe out there.
Hi,
Is beginning of January 2019 a good time to go see the bubbles on Abraham lake? I could make time begining of this Jan, or begining of Feb.
Where do you recommend staying to be close to Abraham lake? Thanks so much for this informative article! Its really helpful and inspiring?
LL is your best bet for accoms. Jan is perfect.
Wow, this is amazing! Your information is great and the photos are breathtaking!!! I hope to go soon. Did you also go to Crescent Falls?
Aye, I like it best when it’s just starting to freeze up.
Your information is great, it is March 19, 2019 and it is +10 on Abraham Lake, do you think it is melting now or we still can see bubbles?
I highly doubt it. The ice is probably an ugly mess.
Hi Gavin –
Great article! Thank you so much for sharing. Question for you…Have you ever used a light source to illuminate the bubbles? If so, do you recommend having the light on top of the ice or underwater?
Point the light down from the top and magic will be revealed.
This was such an informative and inspirational blog, thank you for sharing! This has been a bucket list item for me for a few years now, and I am possibly planning a trip out the second weekend of February. Would you think the ice would be any good to shoot at that time? Or would it be too “trashed”? Current forecast is saying snow on Jan 31 + Feb 1 but partly cloudy the rest of the week (I’m thinking of traveling to Banff the 6-10th). Thanks again!
Love your work, and your generous spirit in sharing. I will be at Abraham Lake March 14 for my 40th birthday and my boyfriend and I plan to build a quincee and sleep there overnight.
I will be bringing my Nikon d5100 and nifty fifty and I’m wondering if you have some tips to get a few food photos.
Hi Gavin –
Great text and great images!
Sometimes I find bubble stacks at Walden Pond (of H. D. Thoreau fame), but they are not as spectacular as yours.
I have a question for you: sometimes on the ice surface I see iridescent patches, showing multitudes of tiny colorful points of light. I’ve never been able to take a sharp picture of them.
Moreover, when I tried that with my new Sony a7RIV, I found that through the viewfinder I see colors only when the objects are not in focus. When they are, colors disappear completely (and are not present in the (RAW) shot.)
Something similar happens when I try to capture color sparks coming from fresh snow.
I wonder if you have an insight into this.
Best,
Konstantin.
I wonder if you’re shooting with too wide an aperture and are maybe seeing chromatic aberration in the field.
(It looks like my reply disappeared somehow)
Thank you for your reply!
It appeared that the color problem was related to very high brightness, and bringing ехposure down helped.
Sharpness problem might be related to light points distributed in the thickness of ice, being at different distances from the camera.
The ice structure appeared to be highly uneven.
I wonder if you’ve seen similar effects in your lakes.