HDR Tutorial – How to Create Realistic HDR Photos Part 1
HDR Tutorial – An Introduction to HDR
One of the questions I get asked the most is ”how do you process your images?”. The answer is that every image gets processed differently depending on the dynamic range, contrast and colours captured in my RAW files. Around 50% of the time I’ll use HDR or ‘High Dynamic Range’ software to compensate for the shortcomings of the sensor in my camera and its inability to capture a wide dynamic range of light. Here is my free HDR Tutorial Part 1.
I’ll come right out and say that I’m not a fan of those ridiculous Photomatix style images that so many people seem to love. I’m not blaming Photomatix, the issue is more with the lack of restraint that many users of Photomatix seem to struggle with.
We’ve all Done It
Be honest, your first attempt at HDR resembled some kind of psychedelic atrocity and you thought it looked awesome… for about 10 seconds. Then you came to your senses otherwise you wouldn’t be reading this HDR Tutorial right now.
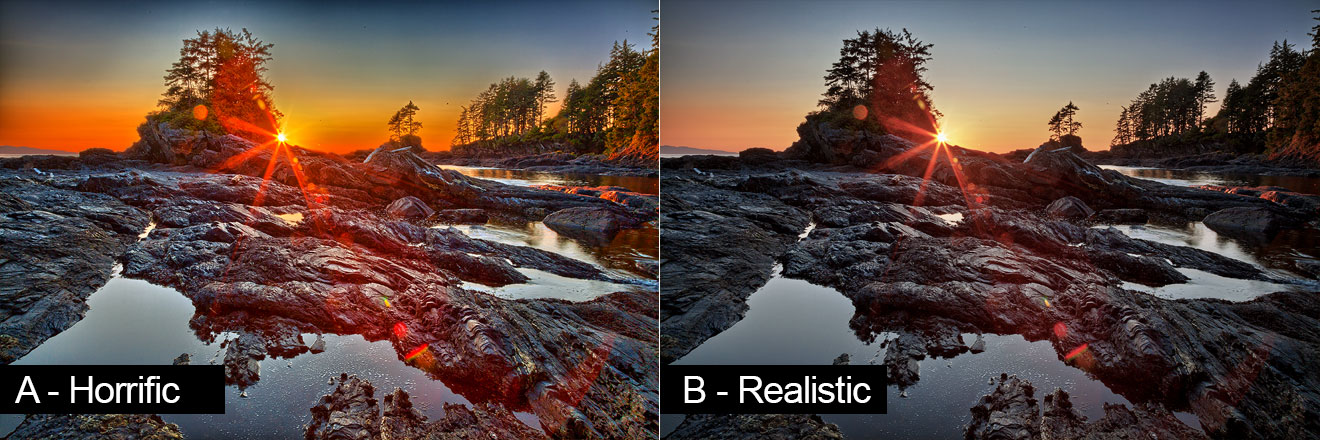
I like to use HDR software simply to fix the areas of my image that have extreme dynamic range such as where a bright sky meets a mountainous horizon and the image goes from bright to dark. For me it’s all about keeping my images looking like a photograph and not some hyper real cartoon. If you like that kind of look I’m genuinely happy for you, I just prefer actual photographs. If you think that the image on the left (A) looks best, please switch off your computer immediately.
The Limits of HDR
When it comes to basic colour correction, sharpening, noise reduction and general image control, I find that most HDR applications lack the finesse of Photoshop even though they usually offer these great features. I only use my HDR app to fix the problem of extreme dynamic range to create a fairly dull, dynamically flat, but still realistic image.
My use of HDR ends there. I don’t use HDR for contrast, micro detail, sharpening, noise reduction, colour correction or any other part of image processing. Everything else gets done in Photoshop the ‘traditional way’.
What HDR Software do I use?
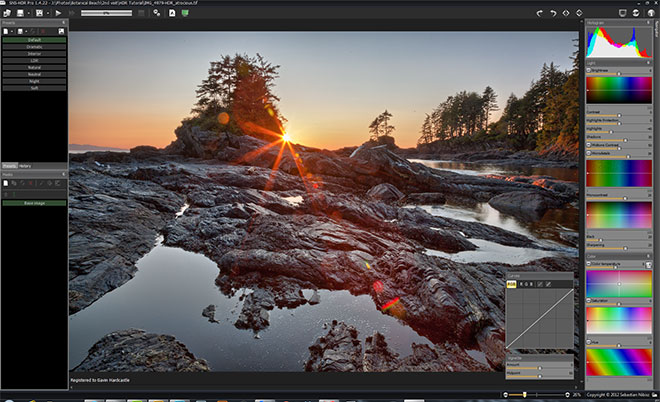
My current weapon of choice is SNS-HDR Pro which makes very ‘neutral’ looking HDR images that still retain realism. I keep the processing pretty flat so that I can export a TIFF and then finish my corrections in Photoshop. This helps to keep the image looking like a real photo. The presets are pretty good and I usually just use the ‘standard’ or ‘neutral’ settings before exporting to Photoshop. You can create and save your own presets.
How to Keep it Real
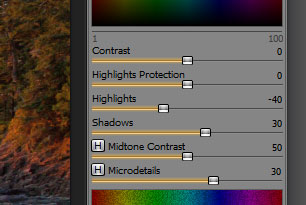 Your two most powerful tools within SNS-HDR Pro are the ‘Highlights’ and ‘Shadows’ sliders. Use these with extreme caution.
As a general rule of thumb I would advise employing a level of ‘forced restraint’.
You can do this simply by dialing back 20% less than whatever you believe looks good to you right now.
If you’re new to HDR, chances are you’ll feel tempted by the ‘Cartoon Devil’ on your shoulder, but that’s a voice you should ignore, trust me.
Simply reduce whatever change you made by around 20% and you’ll sleep better at night knowing that your images still look like photos and not like a 5 year olds hand painting of ‘Tie Dye Armageddon‘.
A Good Rule of Thumb
This is the most important part of this HDR Tutorial. Many people totally overcook their HDR images by adding lots of detail in parts of their image where there are NO details. That’s a surefire way to make things look unnatural. To avoid this pitfall, ask yourself ‘does this part of my image really need to have detail?’. Chances are it doesn’t. By leaving certain parts of your image less detailed it will allow your genuinely detailed areas to shine through. Or you could just leave the ‘microdetail’ slider alone entirely.
A perfect example of overcooking the microdetail would be in wispy clouds, why on earth would you want to add texture and sharpening to wispy clouds? Leave it alone, keep it real.
Get it Right When Shooting
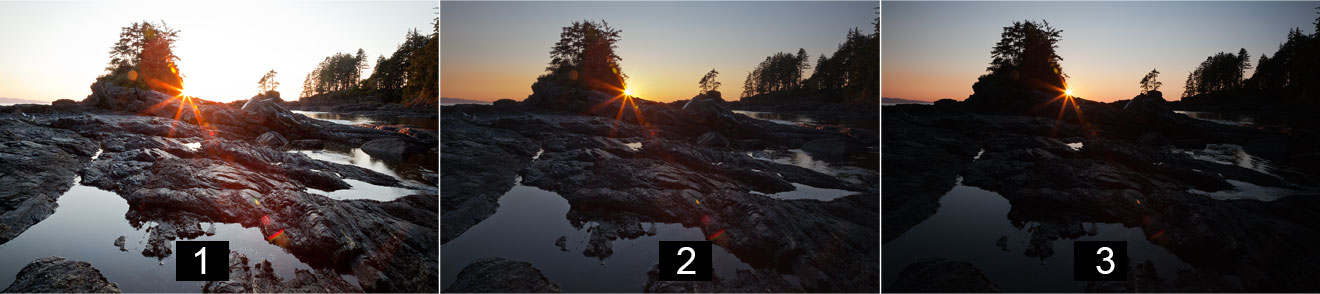
If you’re going to shoot for HDR it helps to have an understanding of how it works. By combining several (but usually three) ‘bracketed’ exposures that range from really dark to really bright, you should be effectively capturing the entire dynamic range of your composition. Here’s an explanation of each bracketed shot:
1 – This shot is over exposed so that we can capture detail in the foreground and shadowed areas. We don’t care that the sky is totally blown out and mostly white.
2 – This shot would be the correct exposure according to my cameras light meter. You can see that although the foreground is too dark, the sky looks less blown out. We could just get away with these two shots but lets take a third.
3 – By taking a really under exposed shot you can see that the foreground is totally useless and mostly completely black. We don’t care about that because this shot was made to capture the vibrant colours in the sky
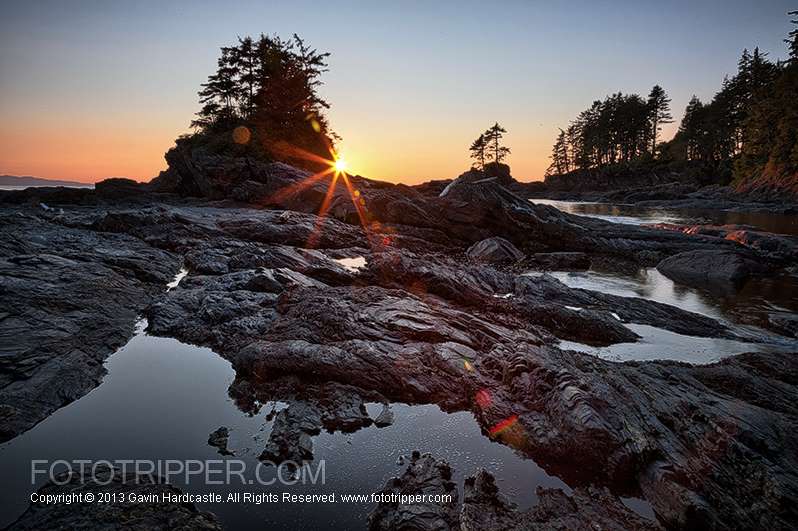
HDR software blends all three together to even out the extreme dynamics in light. Here’s how it looks.
Here are some essential tips for getting good bracketed shots:
- Do NOT move the camera in between bracketed exposures
- Do NOT change ANY camera settings other than exposure time
- Take all of the bracketed shots as quickly as possible to avoid ghosting. For example, if it’s a windy day and the leaves are moving, you’ll find that each shot has the leaves in a different position. This can sometimes look a bit odd when you blend the bracketed shots. The same thing happens with tides.
- Take more shots than you think you need.
- Use your cameras histogram display while shooting to check for blown out highlights.
- Check the images in your viewfinder and if you think there’s any chance of blown out highlights, take some more shots with a shorter exposure time till you’re sure you captured clean high lights.
- When exposing for the shadows be sure to ‘over expose’ by a stop or two. When you darken this image in RAW editing it’ll reduce your noise in the darker areas of those shadows.
Now You Try it – Here’s what Your Going to Need
1 – First download a free trial copy of SNS-HDR Pro if you haven’t already bought it.
2- I’ve put together a little download of the 3 bracketed shots shown above. Download these and load them into SNS-HDR using the ‘open image’ button in the top left. Choose these option during the import process:
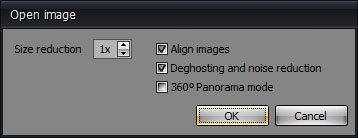
The reason we do this is to prevent ugly ‘ghosting’ in our image where the different tide levels will overlap and make our image look bad. I advise you try doing it without these settings ticked just to see how the ghosting looks.
Once the image loads up I would choose the ‘Natural’ preset as a starting point and then try tweaking from there if you like or export the image to Photoshop for further tweaking. Seeing as you’re already in SNS-HDR however, why not have a play with those sliders and create your own presets.
Here is a preset that I made specifically for this HDR tutorial image, download it and import it to see how it looks. The processing looked so good I might actually do more of it in SNS-HDR instead of exporting to Photoshop.
To import, extract the preset file after downloading then click on the ‘Presets’ button in the top left and choose ‘Import Preset File from’. It should show up as ‘Gavins Basic Twerks’.
Part 2 – HDR Photography – How to Pre-Process RAW files
That’s the end of Part 1 of this HDR Tutorial. In Part 2 I’ll teach you how I pre-process my images in Adobe Camera Raw before using HDR. Click here to read Part 2.
If you have any questions or tips, please feel free to post a comment below.
A great tutorial and nice to see one which doesn’t use PhotoMatix. I was a faithful follower of SNS-HDR up until a year ago, when I changed cameras and the size of the DNG files got much bigger. I found it was taking far longer to process the bracket sets on my ageing PC. I turned to Machinery HDR which but upgrades to that seemed to make it slower and slower and so I have gone back to using PhotoMatix, especially the new Contrast Optimizer which can be found in V5.
I look forward to seeing your post techniques, it’s always nice to see what others do
Thanks for the tip, I’m coming from Luminance HDR, and now experimenting with Photomatix. I’ll try also this piece of software to see how it’s performing.
Great tutorial Gavin! I love the 20% and macro advise having been there done that. As I am still learning this is a great read with your advise ringing true.
Thanks for sharing
My pleasure Rick.
Been a while since this was first posted and the last comment made but I only just found it!!!
As like Mike Hardisty above and yourself I also use or used SNS-HDR but now compared to other HDR software find it so slow, also used Oloneo but both these softwares have been so slow in releasing major updates to there software I turned also to Machinery HDR along with the MagicLantern firmware.
Russ