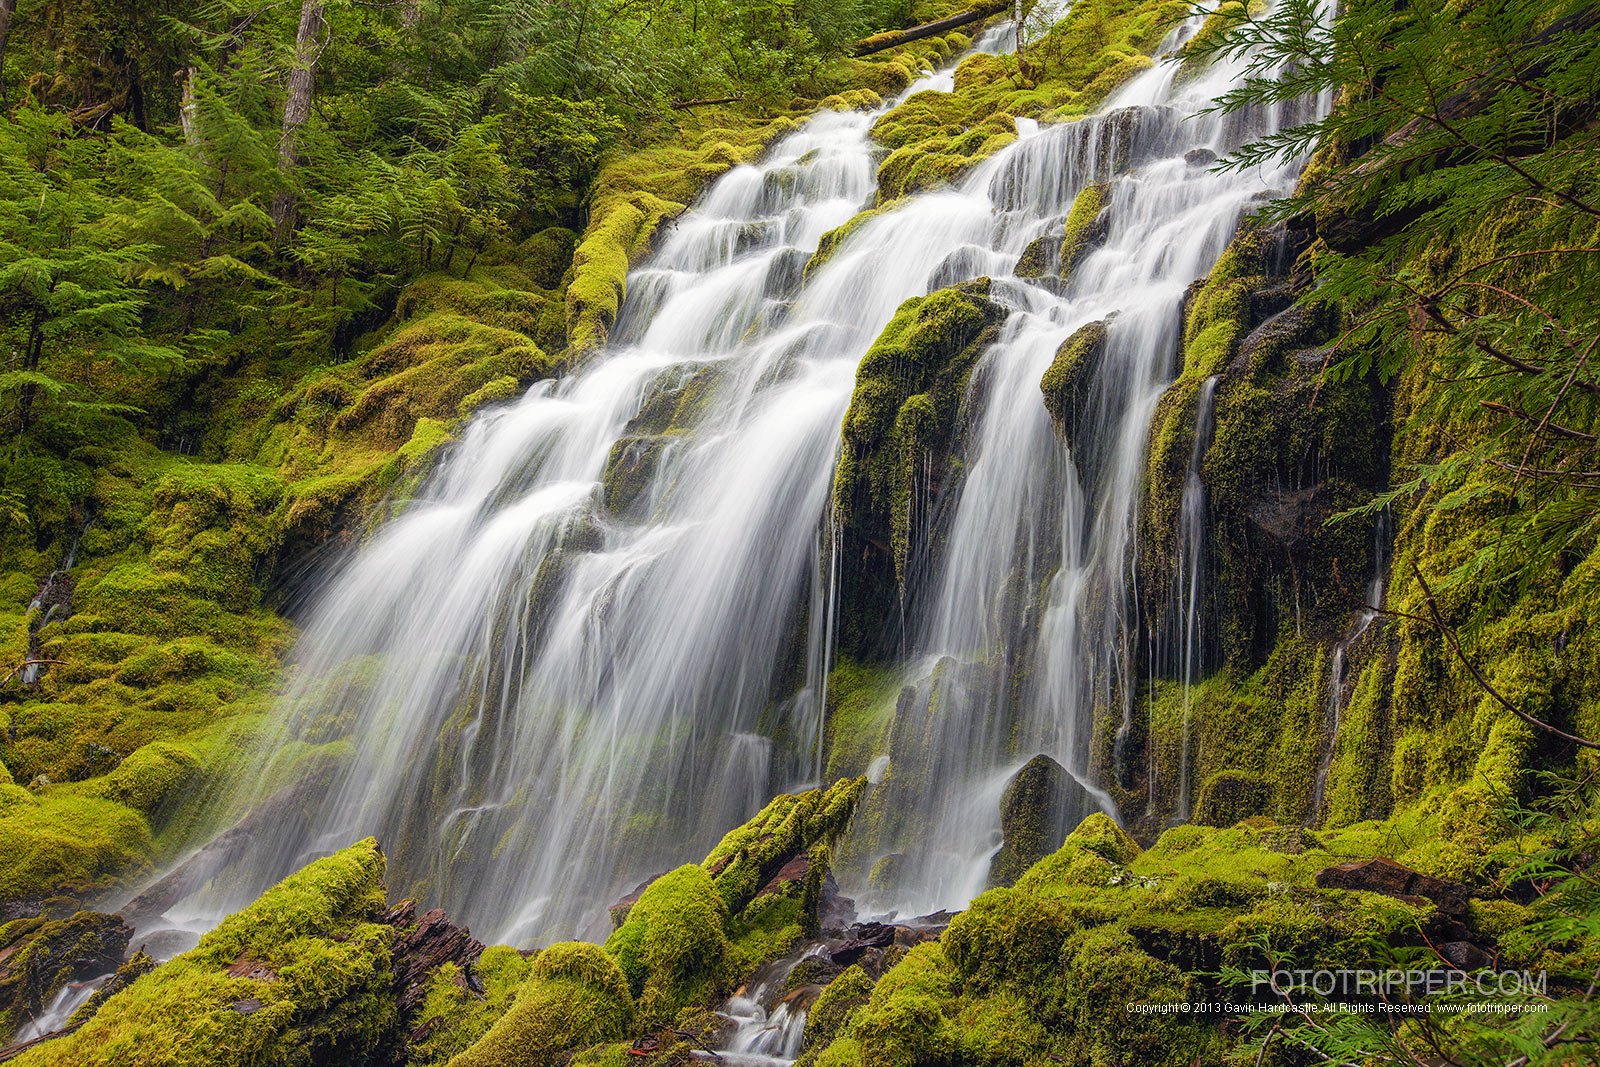
Upper Proxy Falls Photo Tips, Oregon
Proxy Falls is probably one of the most photographed waterfalls in Oregon due to it’s grand scale and epic beauty. However, the often overlooked little sister ‘Upper Proxy Falls’ might not have quite the same wow factor but in terms of photogenic beauty it’s every bit as qualified.
When the spray at Proxy Falls ruins any chance of a splatter free shot, all is not lost. Just walk a few minutes further along the trail and you’ll discover a hidden gem. Here are my Upper Proxy Falls Photo Tips.
Please subscribe to the Fototripper mailing list or hit this ‘Follow’ button below to get Facebook updates. We’d also love it if you tweeted this page.
Top Photo Tips
- Overcast days are typically the way people shoot waterfalls but don’t be afraid to visit during direct sunlight. You’ll need a strong ND filter to block the light if you want milky water shots in bright light.
- A polarizing filter is essential for Proxy Falls. Everything is soaking wet and will reflect lots of white light but as soon as you engage your polarizer that green moss really pops and becomes ultra vibrant.
- Obviously a tripod is essential for long exposures.
- Bring a rain cover if your camera is not weather sealed.
- Pick your season wisely. Obviously there is less flow in summer and I found that the spring flow was ideal. I’d like to see it during a really cold snap with ice and frost.
- Bring a lens cleaning kit, this is a waterfall, your lens will get some wet spots at the least.
- Get close up to the falls and concentrate on a point of interest. An aperture of f/11 to f/8 will give you a lots of depth of field and maximize sharpness.
- Focus on the mossy covered rocks about 2 thirds into the image, don’t try to focus on moving water.
How to Get There
Driving – Situated in the Willamette National Forest, Proxy Falls is about a 1hr and 20 minute drive East of Springfield, Oregon. From Springfield head East on the 126 which starts out as Main St and becomes the McKenzie Highway. After about an hour and ten minutes take a right turn on the 242 and look for the sign for Proxy Falls. The loop trail is on the right of the parking area.
The Trail – It’s an easy 10 minute stroll to the main Proxy Falls. You get to see moss covered lava fields which make for great photos in themselves and If you visit during spring I’m pretty sure you’ll have never seen such vivid green colours.
To visit the main Proxy Falls you have to hike down into the valley to the river bed. You’ll hear and see the falls from the main trail. For this article however, we are going to continue on the trail and then take a right on to a different trail. Just a few minutes along this trail and you’ll hear another waterfall which is Upper Proxy Falls.
You’ll know you’re at the right place if you first come to a pool into which the waterfall pours. Apparently the pool has a hidden overflow which is kind of cool.
Getting the Best Shots
I found that my best shots of Upper Proxy Falls were when I’d climbed up alongside the falls and got really close to the water. Be prepared to get your feet wet and do a little climbing and you’ll be rewarded with some beautiful angles and vantage points.
My shots of the lower part of the falls where it pours into the pool were average at best so get up close and personal to the falling water and moss covered rocks for a more intimate scene. This is where you crop sensor users will benefit from the zoomed in perspective. Sometimes a wide angle lens on a full frame camera just can’t get close enough to the action so be sure to bring along a decent zoom lens.
Gavin,
Thanks for posting tips on Proxy Falls, they will be helpful.
One question, what is the best time of day to go to the falls to avoid as much sunlight as possible? For example the photo you shared in this posting. What time of day was that shot? As for using any ND filters, would you think that just a 3 stop filter suffice or as much as a 10 stop filter?
Also you mentioned using a polarizing filter. Would that be stacked on top of the ND filter?
Thanks.
You’d only need a ND filter if you show up in bright sunlight. Otherwise a CPL will give you plenty of motion blur. 10 stop is utterly pointless in this case. Early morning or late afternoon should give you a sun free falls.