8 Photo Tips for Making Sharper Photos
Everybody wants their photography to be ‘tack sharp’. You can get beautiful lighting conditions, an amazing scene and a perfect composition but if the image isn’t sharp you’re wasting your time. Follow my photo tips for making tack sharp images and you’ll be well on your way to improving the sharpness and quality of your photographs.
Please subscribe to the Fototripper mailing list or hit this ‘Follow’ button below to get Facebook updates. We’d also love it if you tweeted this page.
1 – Use a Sturdy Tripod
Sure, you can take nice ‘handheld’ photos but if you’re serious about image sharpness you’ll need to invest in a sturdy tripod. Don’t waste your money on those rickety $60 tripods, get something with quick release leg mechanisms and high quality manufacturing. A good ball head will also make adjustments much quicker and more flexible. If you shop around it’s possible to get a decent tripod and ball head for around $300.
2 – Use ISO 100 or Lower When Possible
If you increase your ISO settings you’ll loose sharpness due to light diffraction. Unless you absolutely have to go higher, I recommend setting your ISO as low as possible. In low light situations this will slow down your exposure which you may or may not want. Newer cameras are better at squeezing out more light in high ISO shooting situations but there’s a limit. You’ll see a noticeable drop in image sharpness passed ISO 400.
3 – Use a Prime Lens
Prime lenses typically offer better image quality than zoom lenses mainly because the simple construction results in less light diffraction and optical distortion. With a prime however, you’ll need to zoom with your feet and the fixed focal length won’t work in all situations so multiple primes are usually required – which can get expensive. One my favourite prime lenses is the Zeiss 21mm f/2.8 Distagon Lens for Landscape Photographers.
4 – Find the Sweet Spot of your Lens
Most wide angle lenses perform best with apertures from around f/8 to f/11. Don’t expect maximum sharpness from extreme settings like f/2.8 or f/22. Obviously you might prefer these setting for certain effects like shallow depth of field or extremely long exposures but be aware that you’ll sacrifice overall sharpness. Experiment with different aperture settings to discover the sweet spot of your lens.
5 – Use Mirror Lockup
If your camera has a mirror it will most likely have a mirror lockup function which can be enabled in your cameras settings menu. Enabling mirror lockup will force your cameras mirror to engage about half a second before your shutter opens, reducing the movement and vibration within the camera during the shutter release. Any movement and vibration within the camera is a bad thing as it will reduce your sharpness. We want that camera as still as possible so this is a great tip to reduce vibration.
6 – Use Remote Shutter Release or Timer
When your finger presses down on the shutter engage button this causes movement and will result in a loss of sharpness. Eliminate this problem by using a remote shutter release. These can be wireless or a cable release. If you don’t want to spend money on a remote shutter release simply use the cameras 2 second self timer so that the shutter opens long after you’ve removed your hands from the camera.
7 – Focus Properly
A lot depends on your creative vision and shooting style but for maximum sharpness throughout the image using a standard prime lens, here are some basic guidelines. The issue of focusing deserves it’s own dedicated tutorial but here are a few photo tips that will help with focusing.
- Use Manual Focus.
- Use ‘Live View’ if your camera has it. Zoom in and focus manually.
- Don’t focus on clouds, water or any object that offers no sharp, contrasting edges.
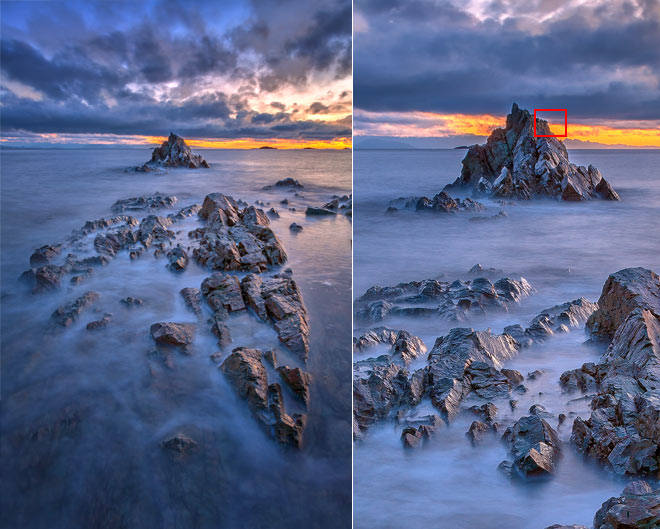
- Focus on a contrasting object that has a clearly defined edge about two thirds of the way into the distance of your image. By that I mean that if you have some foreground objects that are quite close to you it’s best to NOT focus on those as objects or the distant objects will be out of focus. See the featured image for this post above and you’ll notice a red square to indicate where I set my focus.
- Focus on objects in order of priority. If your foreground and most distant objects have less importance to your composition, don’t focus on them. Pick the area of your image that is most important and find a sharp edge within that area, focus on that edge.
If you have a tilt-shift lens or know how to use Focus Stacking you can achieve maximum sharpness throughout the entire image with full depth of field.
8 – Shoot in Bright Light
Obviously bright sun light doesn’t always give you the most atmospheric mood, especially for landscape photography. My favourite light is pre-sunrise and not ideal for delivering ultra sharp images because the camera is struggling to suck in every bit of available light.
Ever wondered how fashion photographers get such super sharp images? It’s because they have a whole rack of lights on hand to deliver intense bursts of light right where they need it.
A twilight image can’t compare with a midday image when it comes to sharpness because the midday image has so much intense light and will result in hardly any noticeable light diffraction.
As an outdoor photographer shooting in low light situations the photo tips above will help you squeeze out as much sharpness as you possibly can from your camera and the scene in front of you.
Good luck, go try it out and let me know your results. Please post comments or questions or let me know if I got something wrong.
A great little write up on the sharpness issue. This is probably the biggest issue of most that are new to photography.
Anthony, your links was displaying a 404 error so I had to delete it. Let me know if the issue gets fixed.
Hi Gavin,
Thanks for the tips and tricks on sharpness. I dabble in all photo subjects. I love landscape and nature photography but I just can’t seem to find my niche. I’m not yet ready to go pro just now, because I feel that my skills need some improvement and so does my confidence. I’m also still studying and practicing basic and fundamentals of digital photography and my photos are improving greatly even, though I always had “eye” for it.Great article it helped me a lot there were some things I didn’t know that affected sharpness-basically the iso and light diffreaction. Going pro with photography is my dream, im just not sure which subject, I like so many its hard to choose, but I most likely will be freelance. Sorry for getting a bit off the subject of sharpness.:)
Glad you found it helpful Laura.
Good tips on sharpness. I have a question. I’m shooting in Upper Antelope Canyon next week and since you’ve shot there before what would you suggest to be the focus points. Foreground, background, edges grain?
It depends on your style. Do you want shallow DOF or wide? I like a wide depth of field so I shot at f/11 and focused on the edges of the walls as far away as I could see them – which is not far. Next time I’d go for something different, maybe use a portrait lens with shallow DOF.
Gavin, I really enjoy reading your blogs and turtorials. I’m recently trying to understand where to focus in my landscape shots and how DOF works with that. I find it interesting in the photo above that you would choose to focus on the pinnacle rock in the distance instead of the forground rocks which seem the to be the main subject, and then letting the focus fall off beyond that as it naturally would in the distance. were you not concerned about the forground rocks being tack sharp? Or maybe they are still within the plane of focus @f11?? Hopefully I’m making sense..
Hi Bobby,
That’s exactly right. I always focus beyond the most obvious object that you’d expect me to focus on because I DO want it to be tack sharp. If you do that and select the correct aperture you’ll achieve maximum sharpness.
Hi Gavin,
I recently read your article. its amazing with lot of useful details about photography and locations. Thanks. I am not a pro. I have Nikon D7100 with 18/200 lens. i do lot of travel and i used to take photos with auto mode. Slowly i am learning to use the other mode to take photos. I have a question and I Apologize if it is an ordinary question. when i take landscape photography with people i am not able to get the sharpness. Either the background is sharp or the person image is sharp. I am not able to focus both sharp at the same time. I heard that set with aperture priority mode as f16 will provide better results. please suggest. Thanks in advance.
Hi Ramasamy,
The issue is that people are usually moving, so, long exposures will result in blurring of the people. You can crank up the ISO so that the camera shoots faster and choose a wider aperture which lets in more light. It all depends on the type of shot you want. You could consider taking two shots, one with a slow exposure and one with a faster exposure that is achieved by a higher ISO setting. You can then blend the two exposures in Photoshop.
Hey, I just came across your article and want to thank you for your tips!
But I have one question, what if I had a seascape with changing light and water conditions (like the ocean)
is focus stacking possible? Or should I take one shot?
It’s a great question Timo. With changing light it’s best to get your shots done as quickly as possible. If it’s a long exposure the water conditions will just be milked so that’s easy, out but if it’s a fast exposure and yuo want to focus stack you’ll have some surgery to do in Photoshop. It’ll be easier if you composition has what I call ‘focus gaps’ where you could even focus stack manually with layer blending. Not all situations give you that luxury though.
Thanks for your fast reply! I think it’s getting even harder when I want to do a exposure stacking…not easy…
Love your show on YouTube.
I was wondering why you don’t use a tilt-shift instead of focus stacking?
I might if you want to send me one…